5 min read
Overview
Even if you're a newbie, rookie, or a pro in Ethereum it really excites all of us to see these developments in Ethereum. Whether it's all the hard forks like Istanbul, Atlantis, etc. or the development of Ethereum 2.0 - there is a lot to keep up with.
In this guide, we're going to show you up to set up a node that is part of the Phase 0 Ethereum 2.0 transition process.
Understanding ETH2 terminology / roadmap
Ethereum is moving towards Ethereum 2.0 (aka ETH2) - the main reason behind this is that the network needs to be upgraded to keep things running smoothly and scale beyond its ~15/transactions per second limit, Ethereum is going to move to Proof Of Stake (POS) from Proof Of Work (POW) so that the network will become easier to run on basic computers.
Such a huge change can't be made at once, so this update will take place in phases
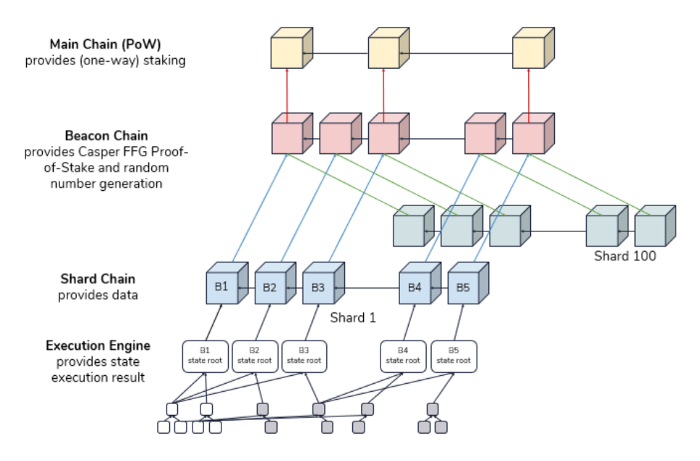
- Phase 0 is called the beacon chain, it's the core of ETH2, which manages validators and the coordination of shards. Once the beacon chain is deployed, other aspects of ETH2 will be bootstrapped from it.
- Phase 1 will have what is called shard chains, which will allow parallel transaction throughput and will be a key to future scalability of the network, 64 Shard chains will be deployed in this phase and more will be added over time.
- Phase 2 is the last phase, where the entire system will come together functionally. Shard chains will be transitioned to a structured chain state from simple data containers and Smart contracts will be reintroduced. There will be virtual machines based on eWASM, which will be managed by a Shard chain.
Since ETH2 will use the Proof of Stake consensus algorithm, there will be validator nodes attesting and proposing new blocks on the beacon chain. ETH2 makes the distinction between beacon nodes and validator clients. A beacon node (or just node) concerns itself with maintaining a view of the beacon chain as well as the shard chain (data chain). As their name suggests, validator clients (or just clients) handle the logic of a single validator. This is achieved by communicating with the beacon nodes to understand the current state of the chain, by attesting to and proposing blocks. Finally, validators ask the beacon node to send this information to its peers.
If you're not running a validator, a beacon node contains all of the information you need to interact in a trustless manner with ETH2, much like a full node in ETH1.
To become a validator you need both, A beacon node and a validator client. You need to deposit exactly 32 ETH on the ETH1 contract to become a validator, therefore if you want to stake more ETH you'll need to run multiple validator clients. Now let’s see how to install and run a beacon node and validator client.
Install Beacon node & validator using Docker
Now, let's install a beacon node and validator. We'll require Docker to accomplish this, to check if docker is already installed on your system type the following in your command prompt/terminal
$ docker -v
If not installed head to the docker installation guide.
Now, as we have Docker installed let’s pull docker image for beacon node and validator.
$ docker pull gcr.io/prysmaticlabs/prysm/beacon-chain:latest
$ docker pull gcr.io/prysmaticlabs/prysm/validator:latest
We are going to run our beacon node now.
$ docker run -it -v $HOME/prysm:/data -p 4000:4000 -p 13000:13000 --name beacon-node gcr.io/prysmaticlabs/prysm/beacon-chain:latest --datadir=/data --p2p-host-ip --min-sync-peers 7
We have included the --p2p-host-ip and --min-sync-peers 7 flags to improve peering.
NOTE: It is recommended to open up port 13000 on your local router to improve connectivity and receive more peers from the network.
Useful commands
The following are some useful commands for interacting with the beacon chain node.
- To stop the beacon chain docker:
$ docker stop beacon-node
- To restart the beacon node, issue the following command:
$ docker start -ai beacon-node
- To delete a corrupted container, issue the following command:
$ docker rm beacon-node
- To recreate a deleted container and refresh the chain database, issue the start command with an additional
--clear-dbparameter:
$ docker run -it -v $HOME/prysm:/data -p 4000:4000 -p 13000:13000 --name beacon-node gcr.io/prysmaticlabs/prysm/beacon-chain:latest
  --datadir=/data --clear-db --p2p-host-ip --min-sync-peers 7
Staking ETH: Running a validator client
As soon as the beacon node is up, the chain will be waiting for you to deposit 3.2 Goerli ETH (in mainnet it's equivalent to 32 ETH) into a validator deposit contract in order to activate the validator. Every staked 3.2 Goerli ETH represents a validator, in order to stake more ETH, we need to run multiple validator clients. We'll explain how to get some free ETH to deposit in the next section...
Activating your validator
You can find more instructions on setting up a validator and using the Göerli ETH faucet for deposit at prylabs.net.
It may take a while for the node to process a deposit in the network, Once the node is active the validator will begin to perform it's tasks immediately. In the validator client, we can see the validator balance as it goes up over time.
Note: The node should not go offline for a long period or else a validator will start gradually losing its deposit until it is removed from the network entirely.
If you don’t want to become a validator, then the beacon node is enough to read chain data and create Dapps (Dapps support will not be available until phase 1).
Conclusion
If you want to participate in ETH2 testnet, check out the complete instructions here, and if you're facing any problem you can reach out to Prysmatic lab's team via their discord server.
Subscribe to our newsletter for more articles and guide on Ethereum. If you have any feedback, please feel free to reach out to us via Twitter and you can always chat with us if you have a question via our community server on Discord, thanks :)
We ❤️ Feedback!
Let us know if you have any feedback or requests for new topics. We'd love to hear from you.