14 min read
Overview
In the digital era, endpoint security is crucial. As blockchain endpoints serve as interfaces that enable interaction with blockchains, securing these endpoints is vital to prevent unauthorized access. Given the immutable nature of blockchain transactions, ensuring that only authorized requests reach your endpoint is crucial for maintaining the integrity and reliability of your blockchain operations.
While general security measures are important, they may not fully address the specific needs of blockchain endpoint security. This is where the Endpoint Armor add-on becomes essential. Endpoint Armor enhances security by enabling method-specific access controls and customizable rate limits. These features ensure that only authorized interactions occur and that the endpoint can handle the traffic without being overwhelmed, thus significantly enhancing your system's security and stability. This add-on is particularly ideal for securely exposing a URL in the front-end of your application.
In this guide, you will learn how to increase the security of your QuickNode endpoint using Endpoint Armor.
What You Will Do
Activate Endpoint Armor: You'll start by enabling Endpoint Armor on your chosen QuickNode endpoint.
Configure Method Restrictions: You will identify and restrict specific blockchain methods crucial for your endpoint's security. This includes blocking unnecessary methods or limiting access to them.
Apply Method-Specific Rate Limits: For finer control, you will set rate limits on individual blockchain methods, ensuring that critical functions are not overwhelmed by excessive requests.
Set Global Rate Limits: You'll establish a global rate limit for your endpoint to control overall traffic and prevent overload or abuse.
Implement Visitor-Specific Rate Limits: You will customize rate limits for different types of visitors to your endpoint, such as regular users, developers, or smart contract operators, based on their specific needs and usage patterns.
What You Will Need
- A QuickNode account
- A basic understanding of blockchain concepts
- Knowledge of HTML, CSS, JavaScript & React
- Ethers.js (version 6)
- A code editor (i.e., VScode)
Endpoint Armor Overview
Endpoint Armor is a security add-on developed by QuickNode, and it enables specific method restrictions on your QuickNode endpoint, along with the capability to establish rate limits for individual methods. Additionally, it offers the functionality to set overall rate limits for the entire endpoint and configure rate limits tailored to each unique visitor.
Endpoint Armor creates a specific URL with the limitations that you set for your endpoint. These limitations do not apply to your endpoint's default URL.
| Default Endpoint | Secured Endpoint | |
|---|---|---|
| URL | demo-endpoint.quiknode.pro | demo-endpoint.secure.quiknode.pro |
| Limitations | No rate limitation | Rate limitation based on configuration |
Endpoint Armor's primary features include:
- Method Limitations: This feature permits only the methods that are explicitly listed in this setting with either method-specific rate limits or global rate limits.
- Endpoint Rate Limits: These are global rate limits applicable to the entire endpoint.
- Visitor Rate Limits: These limits apply to each unique visitor to a website.
Method Limitations
At least one method name must be specified in the configuration when setting up rate limits. This is because Endpoint Armor, by default, blocks all methods that are not explicitly mentioned in the settings. Therefore, to ensure that your endpoint allows access to the required methods, you must list each method you intend to use.
In method limitations, you can enable a method either without a specific rate limit or with a unique rate limit, independent of the global settings.
In addition to the standard rate limit settings, certain methods offer extra options for further customization:
eth_call (EVM chains only)
contractAllowlist: An array of contract addresses that can be called. Only the contracts specified in this array can be called witheth_callwhen this option is set.
eth_getLogs and eth_getBlockByNumber (EVM chains only) | getBlock (Solana)
latestBlocks: The limit of blocks that can be queried from the latest block. The latest block is determined by eth_blockNumber. For example, if the latest block number is 1000, and latestBlocks is set at 100, any range of blocks within 900-1000 (inclusive) can be queried.minBlockNumber: The lowest block number that can be queried. For example, if minBlockNumber is set to 1000, any block number below 1000 cannot be queried.maxBlockNumber: The highest block number that can be queried. For example, if maxBlockNumber is set to 1000, any block number above 1000 cannot be queried.
Endpoint Rate Limits
The endpointRateLimits key defines the global rate limits for the entire endpoint. It provides an overall control method for controlling endpoint traffic.
Visitor Rate Limits
The visitorRateLimits key defines the rate limits per unique visitor to a website. These restrictions become especially important for requests that contain browser headers, suggesting they come from individual users rather than being generated by server-side operations.
Understanding Standard Rate Limit Options
For configuring rate limits in Endpoint Armor, three key options are available: reqPerHour, reqPerMinute, and reqPerSecond. These options are valid for setting limits across different levels: the entire endpoint, individual visitors, and specific methods. Here's how they function:
reqPerHour: Sets the maximum number of requests allowed within an hour.reqPerMinute: Defines the limit of requests permissible per minute.reqPerSecond: Restricts the number of requests that can be made in a second.
Ideal Endpoint Security Settings
When enabling Endpoint Armor on an endpoint, ensure that token-based authentication is enabled, as the primary security measure. Please be aware that disabling token-based authentication will result in Endpoint Armor not functioning as intended. To maintain a seamless and effective security setup, please don't make changes to other security page settings, as doing so may impact the proper functioning of Endpoint Armor. If you have any questions, please reach out to support or ask in the Quicknode Discord.
Set Up Endpoint Armor
First, you'll need a QuickNode endpoint that has access to a network you desire. For the purpose of this tutorial, we'll use an Ethereum mainnet; however, the same steps are applicable to other supported chains as well. For all supported chains, check the Endpoint Armor page.
Sign up for a free account here. Once logged in, click the Create an endpoint button, then select the Ethereum chain and Mainnet network.
Then, you'll need to add the Endpoint Armor add-on to your endpoint. You can do this during the endpoint creation process or after by going to the Add-ons tab on your endpoint's page and clicking the Explore button on the Endpoint Armor add-on.
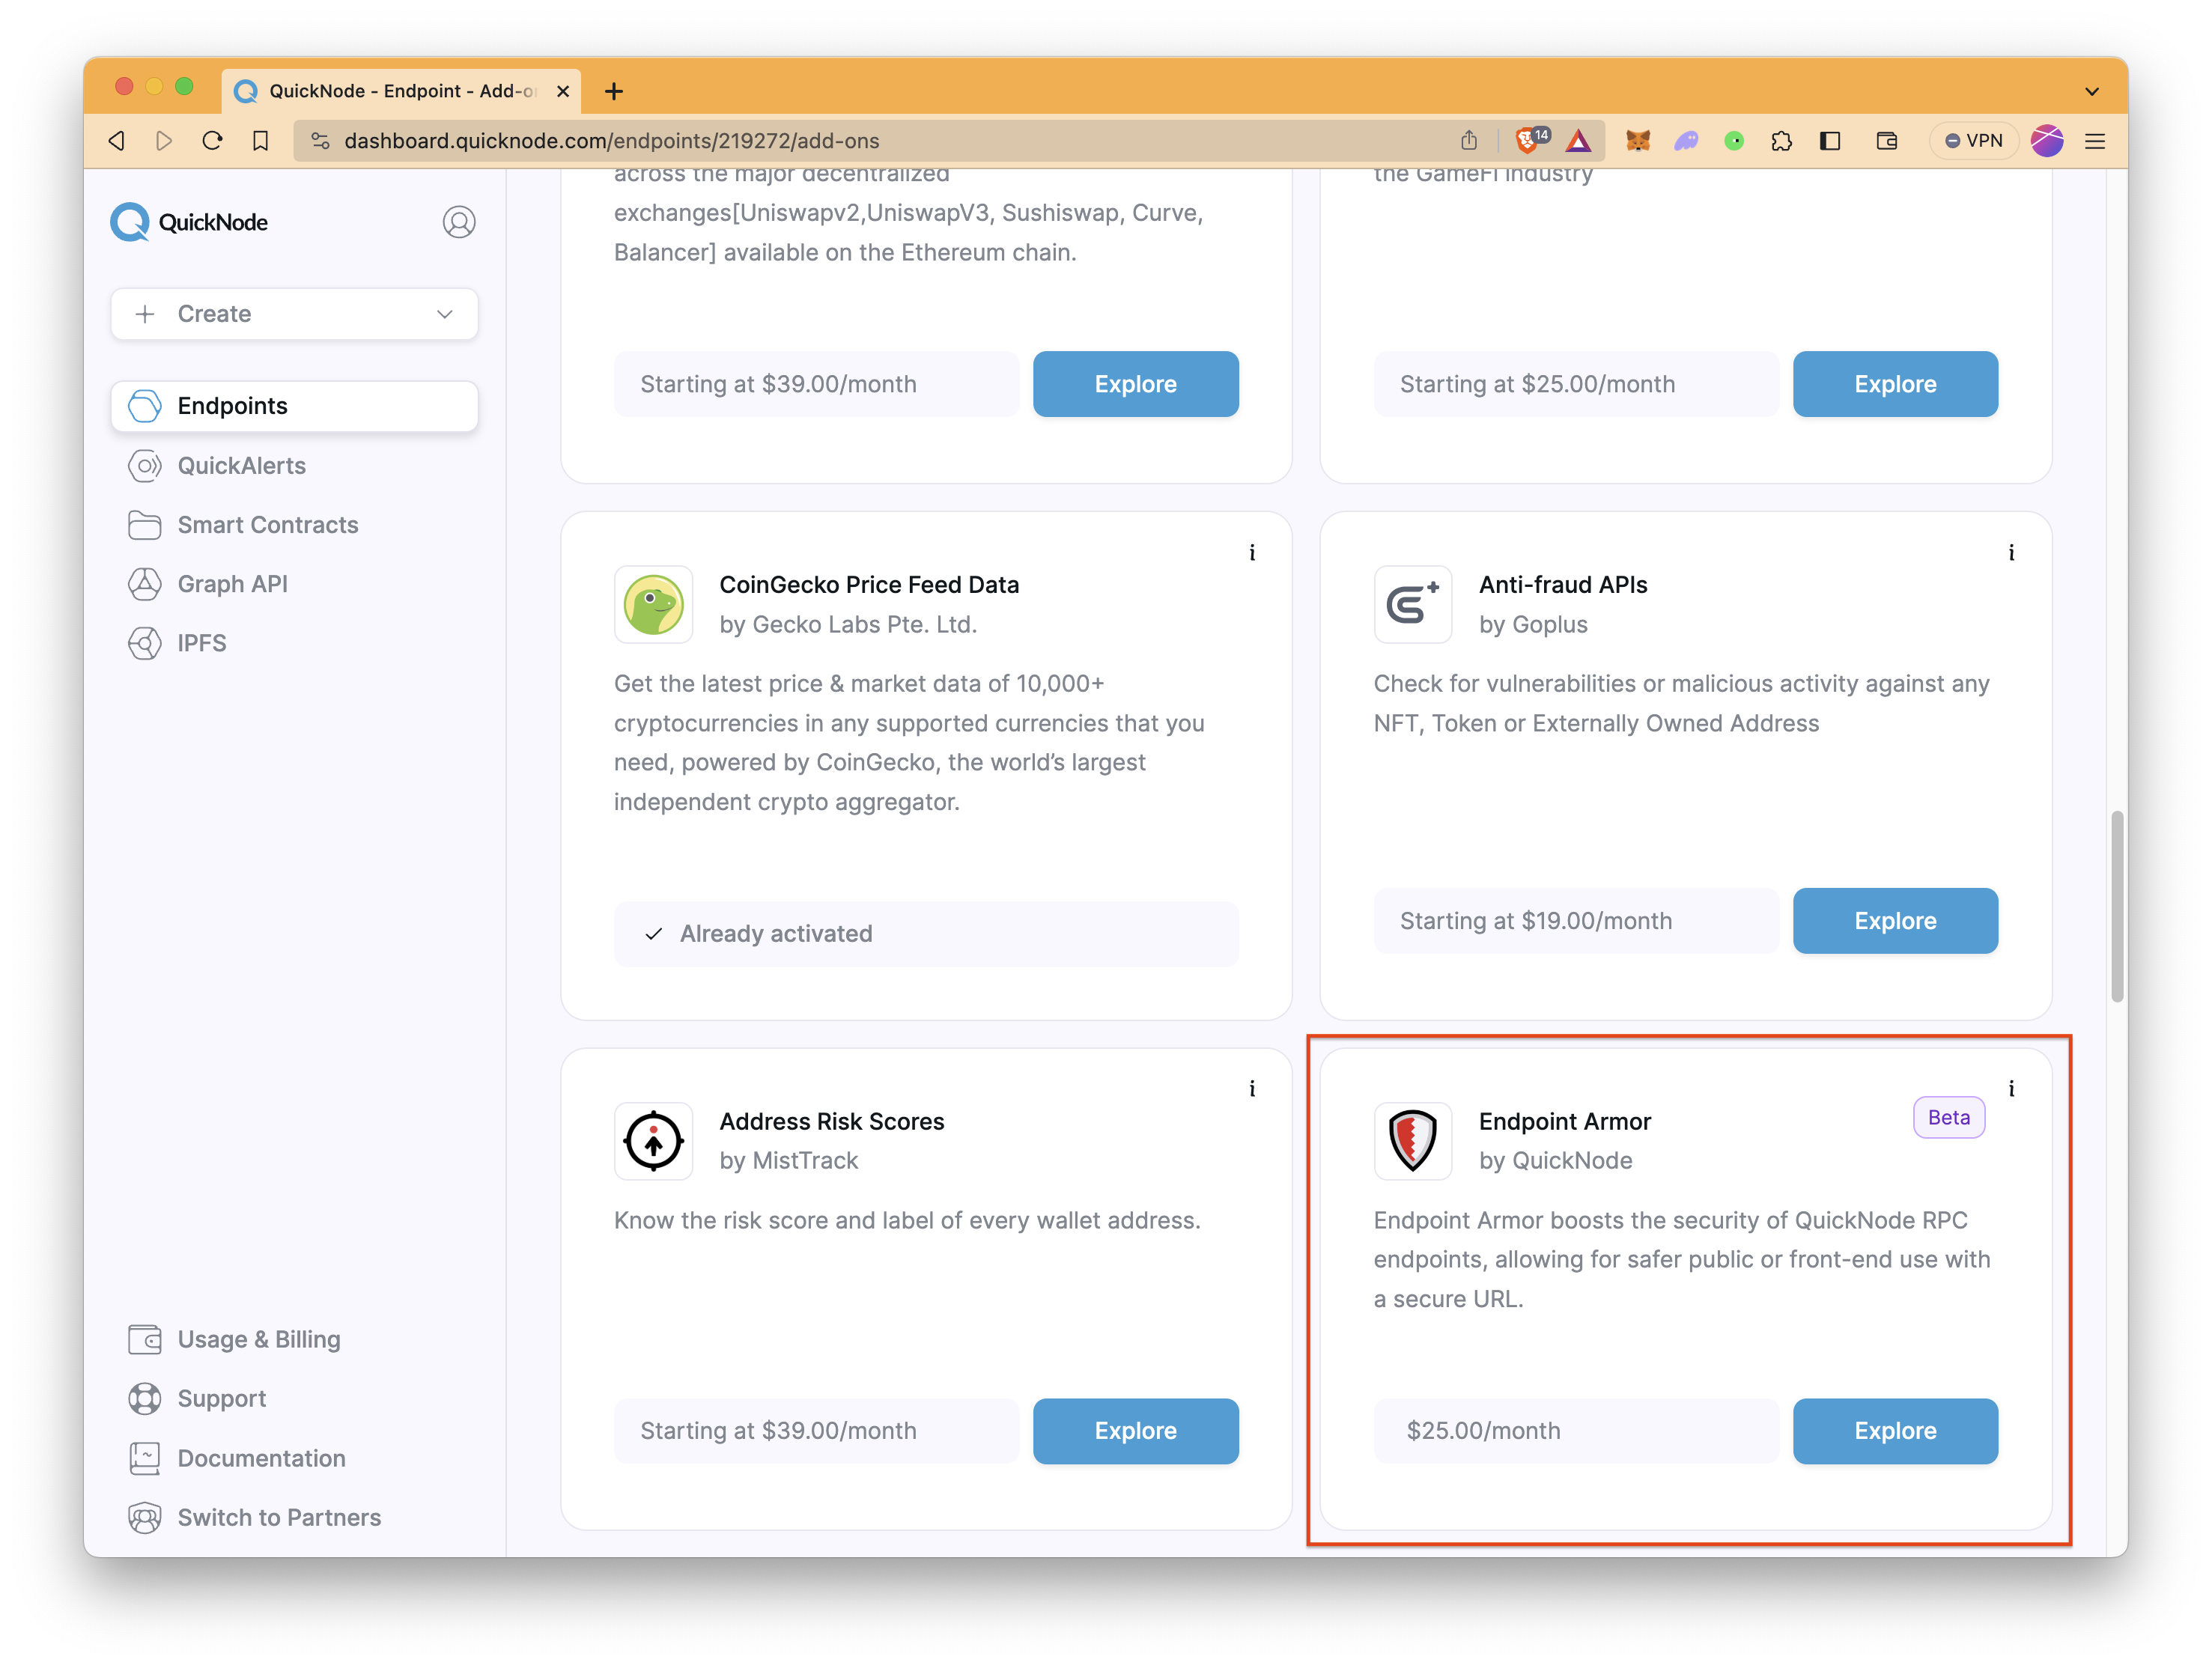
Once your add-on is enabled, you will see it on the Add-ons tab.
Configure Your Settings
Now, let's start to add some limitations to the endpoint.
After enabling the add-on, find the Endpoint Armor in the Add-ons tab, click (⋯), and select Dashboard to open Endpoint Armor's configuration page.
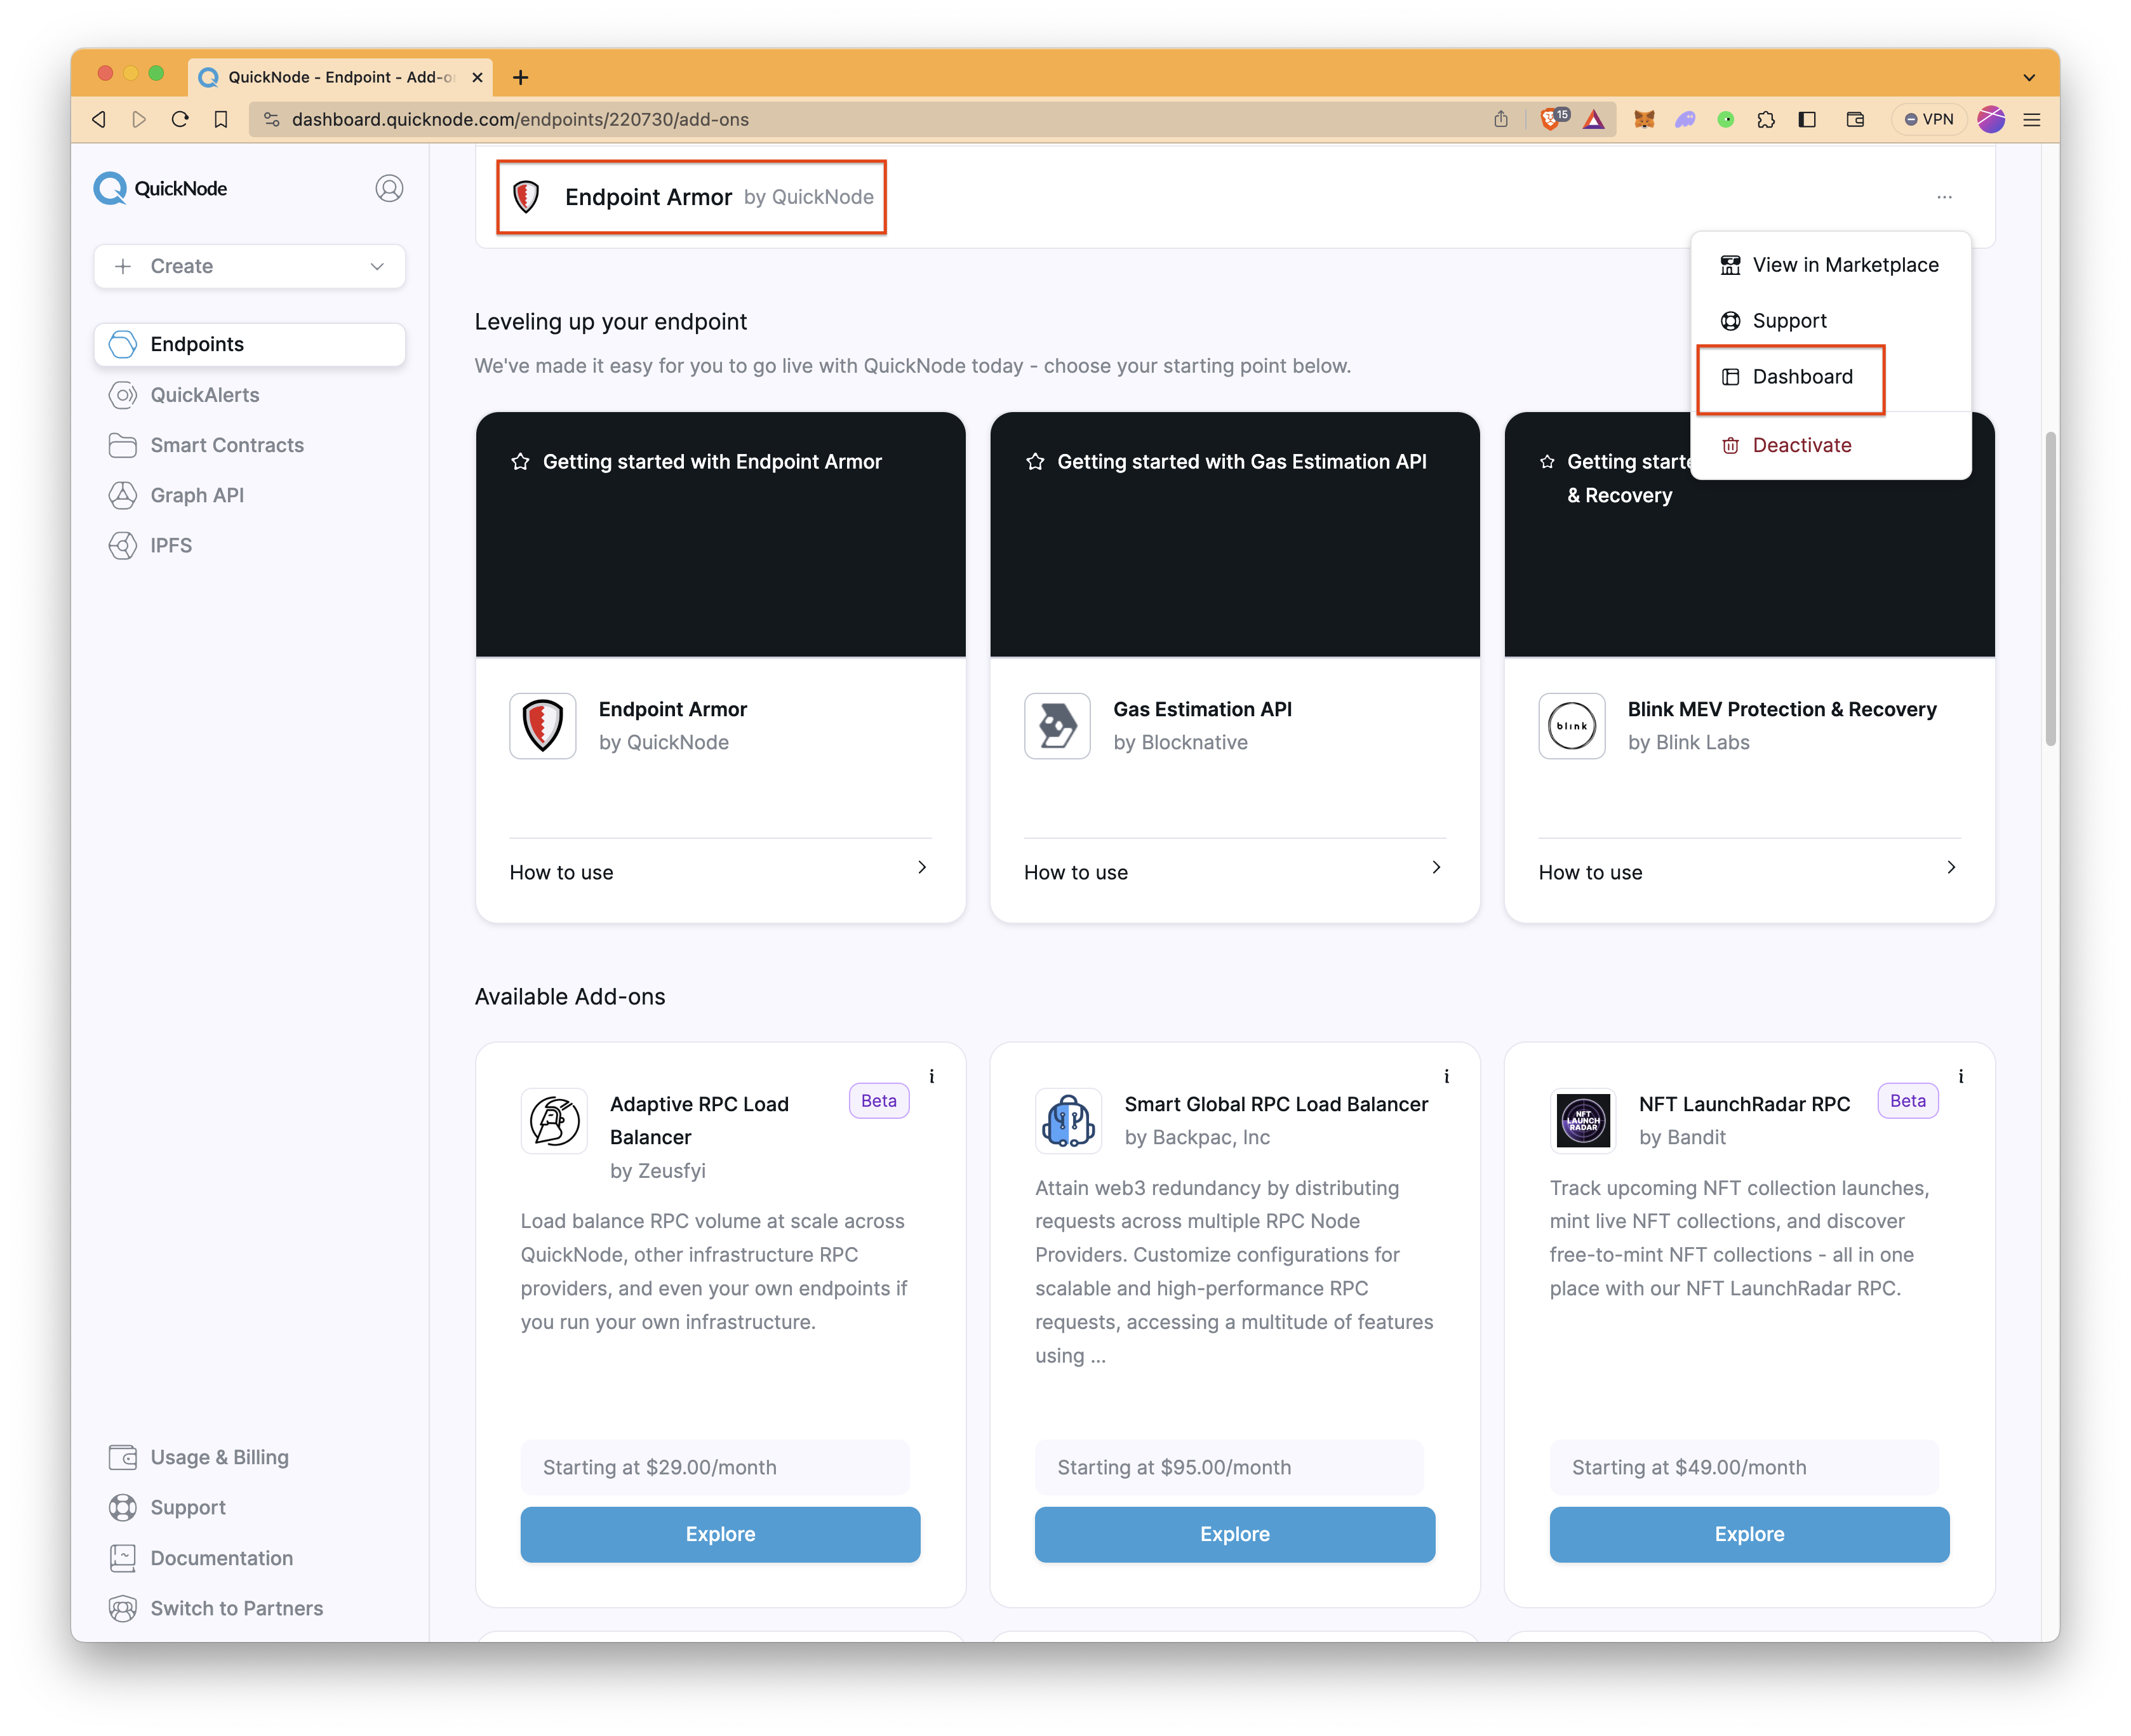
Open the Endpoint Armor page, and select the endpoint that you want. You will see a Secured RPC URL. All your Endpoint Armor configuration will be applied to this secured endpoint URL. Feel free to use this endpoint URL for your developments.
You have the flexibility to create a customized configuration for your endpoint by combining any of the
endpointRateLimits,visitorRateLimits, andmethodRateLimitssettings, or you can choose to implement just one of them.
Step 1: Specify Allowed Methods
Since Endpoint Armor, by default, blocks all methods that are not explicitly mentioned in the settings, the first step should be specifying allowed methods.
Example Use Case:
- Your dApp needs eth_call, eth_chainId, eth_getLogs, eth_gasPrice, and eth_blockNumber methods to display necessary information on the frontend and to enable users to send transactions.
- You want to set up a unique rate limit for eth_blockNumber to allow only 1 request per second.
- You don't want to set up a unique rate limit for other methods; however, you want to set up a global rate limit for your endpoint. - we will cover it in the following steps.
- You want to limit the
eth_getLogsquery to only the latest 100 blocks. - You only want eth_call requests to be sent to contracts of USDT (0xdAC1...1ec7 for Ethereum mainnet) and USDC (0xA0b8...eB48 for Ethereum mainnet).
Here is the sample configuration to enable these method limitations.
{
    "methods": {
        "eth_call": {
            "contractAllowlist": [
                "0xdAC17F958D2ee523a2206206994597C13D831ec7",
                "0xA0b86991c6218b36c1d19D4a2e9Eb0cE3606eB48"
            ]
        },
        "eth_chainId": "enabled",
        "eth_getLogs": {
            "latestBlocks": 100
        },
        "eth_gasPrice": "enabled",
        "eth_blockNumber": {
            "reqPerSecond": 1
        }
    }
}
Step 2: Set Global Rate Limits
In addition to the method-specific rate limits, you can set up a global rate limit, the maximum number of requests that can be made to the endpoint within a specific timeframe, for your endpoint by configuring standard rate limit options.
Continue on the example use case:
- You want to set up a global rate limit of 200 requests in a minute. So, your endpoint will give an error after more than 200 requests until the next minute.
{
    "methods": {
        "eth_call": {
            "contractAllowlist": [
                "0xdAC17F958D2ee523a2206206994597C13D831ec7",
                "0xA0b86991c6218b36c1d19D4a2e9Eb0cE3606eB48"
            ]
        },
        "eth_chainId": "enabled",
        "eth_getLogs": {
            "latestBlocks": 100
        },
        "eth_gasPrice": "enabled",
        "eth_blockNumber": {
            "reqPerSecond": 1
        }
    },
    "endpointRateLimits": {
        "reqPerMinute": 200
    }
}
Step 3: Implement Visitor-Specific Rate Limits
This part sets the rate limits for each individual visitor to a website, crucial for requests with browser headers, signifying they come from personal users rather than server-side operations. The visitor rate limit can be adapted to your specific requirements, providing flexibility in managing traffic from different visitors.
Continue on the example use case:
- You want to set up a visitor rate limit of 10 requests in a minute.
Now, let's add the visitor rate limit to your configuration. This setup ensures that a specific visitor can only make up to 10 requests per minute. Should this limit be exceeded, subsequent requests from that visitor will be blocked until the next minute. Since the endpoint rate limit is still attached, let's not forget that it is still valid.
{
    "methods": {
        "eth_call": {
            "contractAllowlist": [
                "0xdAC17F958D2ee523a2206206994597C13D831ec7",
                "0xA0b86991c6218b36c1d19D4a2e9Eb0cE3606eB48"
            ]
        },
        "eth_chainId": "enabled",
        "eth_getLogs": {
            "latestBlocks": 100
        },
        "eth_gasPrice": "enabled",
        "eth_blockNumber": {
            "reqPerSecond": 1
        }
    },
    "endpointRateLimits": {
        "reqPerMinute": 200
    },
    "visitorRateLimits": {
        "reqPerMinute": 10
    }
}
Summary
As a quick recap, here is the summary table.
| Rate Limit | Specific Limit | |
|---|---|---|
| Max. Request of Endpoint | 200 req/minute | |
| Max. Request by a Visitor | 10 req/minute | |
| Allowed Methods | ||
| eth_call | No specific limit | Only allowed contracts |
| eth_chainId | No specific limit | |
| eth_getLogs | No specific limit | Only latest 100 blocks |
| eth_gasPrice | No specific limit | |
| eth_blockNumber | 1 req/second |
Test Your Settings
After learning more about the configuration, let's test if Endpoint Armor works as intended. Modify your configuration by following the one below.
This JSON configuration restricts the eth_call method on your endpoint to just 5 requests per hour and allows calls exclusively to the contract with the address 0xdAC17F958D2ee523a2206206994597C13D831ec7.
To summarize:
- methods other than eth_call are not allowed,
- requests that try to interact with contracts other than
0xdAC17F958D2ee523a2206206994597C13D831ec7using the eth_call method are not allowed, - more than 5 requests in an hour are not allowed.
{
    "methods": {
        "eth_call": {
            "reqPerHour": 5,
            "contractAllowlist": ["0xdAC17F958D2ee523a2206206994597C13D831ec7"]
        }
    }
}
Not Allowed Contracts
Now, open your terminal, copy the code below, replace YOUR_ENDPOINT_ARMOR_HTTP_URL with your secured endpoint URL, and run the code.
In this call, you will send eth_call to the 0x6b175474e89094c44da98b954eedeac495271d0f contract address, which is not allowed in the configuration. This code sends a request to call the name() function.
curl YOUR_ENDPOINT_ARMOR_HTTP_URL \
-X POST \
-H "Content-Type: application/json" \
--data '{"method":"eth_call","params":[{"to":"0x6b175474e89094c44da98b954eedeac495271d0f","data":"0x06fdde03"}],"id":1,"jsonrpc":"2.0"}'
After running the code, you will get a similar result below since the contract is not allowed.
{"error":"Blocked by QuickNode Endpoint Armor: contract is not allowed"}
Allowed Contracts
Let's change the contract address and try to call the name() function again. Replace YOUR_ENDPOINT_ARMOR_HTTP_URL with your secured endpoint URL, and run the code.
curl YOUR_ENDPOINT_ARMOR_HTTP_URL \
-X POST \
-H "Content-Type: application/json" \
--data '{"method":"eth_call","params":[{"to":"0xdAC17F958D2ee523a2206206994597C13D831ec7","data":"0x06fdde03"}],"id":1,"jsonrpc":"2.0"}'
The result will be like the one below. The result may not seem meaningful, but it is the hexadecimal value of Tether USD. We simply get the name of the USDT contract.
{"jsonrpc":"2.0","id":1,"result":"0x0000000000000000000000000000000000000000000000000000000000000020000000000000000000000000000000000000000000000000000000000000000a5465746865722055534400000000000000000000000000000000000000000000"}
Rate Limit
For now, the contractAllowlist limitation works as intended. Now, it's time to try the rate limit. Since our limitation is 5 requests per hour, you should get an error after the first 5 requests within an hour, just like the one below.
{"error":"Blocked by QuickNode Endpoint Armor: Too many total requests for method"}
Disabled Methods
Since the only allowed method is eth_call, you should get an error after trying to call another method. After replacing your endpoint with the placeholder, run the code below to call the eth_chainId method.
curl YOUR_ENDPOINT_ARMOR_HTTP_URL \
-X POST \
-H "Content-Type: application/json" \
--data '{"method":"eth_chainId","params":[],"id":1,"jsonrpc":"2.0"}'
The result should be similar to the one below.
{"error":"Blocked by QuickNode Endpoint Armor: Method disabled"}
Creating and Testing a React App with a Secure Endpoint
This section of the guide will walk you through creating a simple React application that interacts with a blockchain via a secure endpoint using ethers.js. This setup is particularly crucial for front-end applications, as it ensures that your normal QuickNode endpoint URL is not exposed and remains protected, mitigating the risk of unauthorized access and attacks.
Keep your secured endpoint URL handy since it will be needed during the development of this section. If you haven't enabled Endpoint Armor yet, check the Set Up An Endpoint Armor section.
Before moving forward, edit your current Endpoint Armor configuration similar to the one below.
{
    "methods": {
        "eth_call": {
            "contractAllowlist": ["0xdAC17F958D2ee523a2206206994597C13D831ec7"]
        }
    },
    "visitorRateLimits": {
        "reqPerMinute": 3
    }
}
In the following React example, we will use the Ethereum mainnet network contract addresses for USDT and DAI. If you plan to use a different network, make sure to change the contract addresses as needed.
Step 1: Create a new React app by running:
npx create-react-app my-secured-app
Step 2: Navigate into your app's directory:
cd my-secured-app
Step 3: Install ethers.js and dotenv:
npm install ethers dotenv
Step 4: Create a .env file in the root of your project and add your secured QuickNode endpoint URL:
REACT_APP_QUICKNODE_ENDPOINT="YOUR_ENDPOINT_ARMOR_HTTP_URL"
Step 5: Modify the src/App.js file as specified below to create the UI.
import React, { useState } from 'react'
import './App.css'
import { ethers } from 'ethers'

function App() {
    // State variables for counting calls and storing results and errors
    const [tetherCallCount, setTetherCallCount] = useState(0)
    const [daiCallCount, setDaiCallCount] = useState(0)
    const [tetherResult, setTetherResult] = useState('')
    const [daiResult, setDaiResult] = useState()

    // Initializing ethers provider with QuickNode Endpoint from .env
    // Modify ethers.Network.from() in case of using other networks than Ethereum.
    const provider = new ethers.JsonRpcProvider(
        process.env.REACT_APP_QUICKNODE_ENDPOINT,
        ethers.Network.from('mainnet'),
        { staticNetwork: true }
    )

    // Contract addresses for Tether and DAI
    // Update contract addresses in case of using other networks than Ethereum.
    const contractAddresses = {
        tether: '0xdAC17F958D2ee523a2206206994597C13D831ec7',
        dai: '0x6B175474E89094C44Da98b954EedeAC495271d0F',
    }

    // Common ABI for both contracts, specifically for the 'name' function
    const contractABI = [
        {
            constant: true,
            inputs: [],
            name: 'name',
            outputs: [{ name: '', type: 'string' }],
            payable: false,
            stateMutability: 'view',
            type: 'function',
        },
    ]

    // Creating ethers Contract instances for Tether and DAI
    const tetherContract = new ethers.Contract(
        contractAddresses.tether,
        contractABI,
        provider
    )

    const daiContract = new ethers.Contract(
        contractAddresses.dai,
        contractABI,
        provider
    )

    // Function to handle the call to Tether's contract
    const handleTetherCall = async () => {
        try {
            setTetherResult('')
            setTetherCallCount(prevCount => prevCount + 1)

            const data = await tetherContract.name()
            setTetherResult(data)
        } catch (error) {
            console.error(error)
        }
    }

    // Function to handle the call to DAI's contract
    const handleDaiCall = async () => {
        try {
            setDaiResult('')
            setDaiCallCount(prevCount => prevCount + 1)

            const data = await daiContract.name()
            setDaiResult(data)
        } catch (error) {
            console.error(error)
        }
    }

    return (
        <div>
            <button onClick={handleTetherCall}>Call Tether's Contract</button>
            {tetherResult && <p>Result: {tetherResult}</p>}
            <p>Calls Requests Counter: {tetherCallCount}</p>
            <button onClick={handleDaiCall}>Call DAI's Contract</button>
            {daiResult && <p>Result: {daiResult}</p>}
            <p>Calls Requests Counter: {daiCallCount}</p>
        </div>
    )
}
export default App
Step 6: Modify the src/index.css file as specified below to add some styling.
/* Global Styles */
body {
    font-family: 'Arial', sans-serif;
    background-color: #f4f4f4;
    margin: 0;
    padding: 0;
    display: flex;
    justify-content: center;
    align-items: center;
    height: 100vh;
}

/* App Container */
.App {
    text-align: center;
    background-color: #fff;
    padding: 20px;
    border-radius: 8px;
    box-shadow: 0 0 10px rgba(0, 0, 0, 0.1);
}

/* Buttons */
button {
    background-color: #007bff;
    color: white;
    padding: 10px 15px;
    border: none;
    border-radius: 4px;
    cursor: pointer;
    margin-right: 10px;
    font-size: 16px;
    transition: background-color 0.3s;
}

button:hover {
    background-color: #0056b3;
}

/* Paragraphs for counters and error messages */
p {
    color: #333;
    font-size: 16px;
    margin-top: 15px;
}
Step 7: Start your React app.
npm start
The app should now be running on http://localhost:3000. You can interact with the buttons and see the counters and error messages as expected.
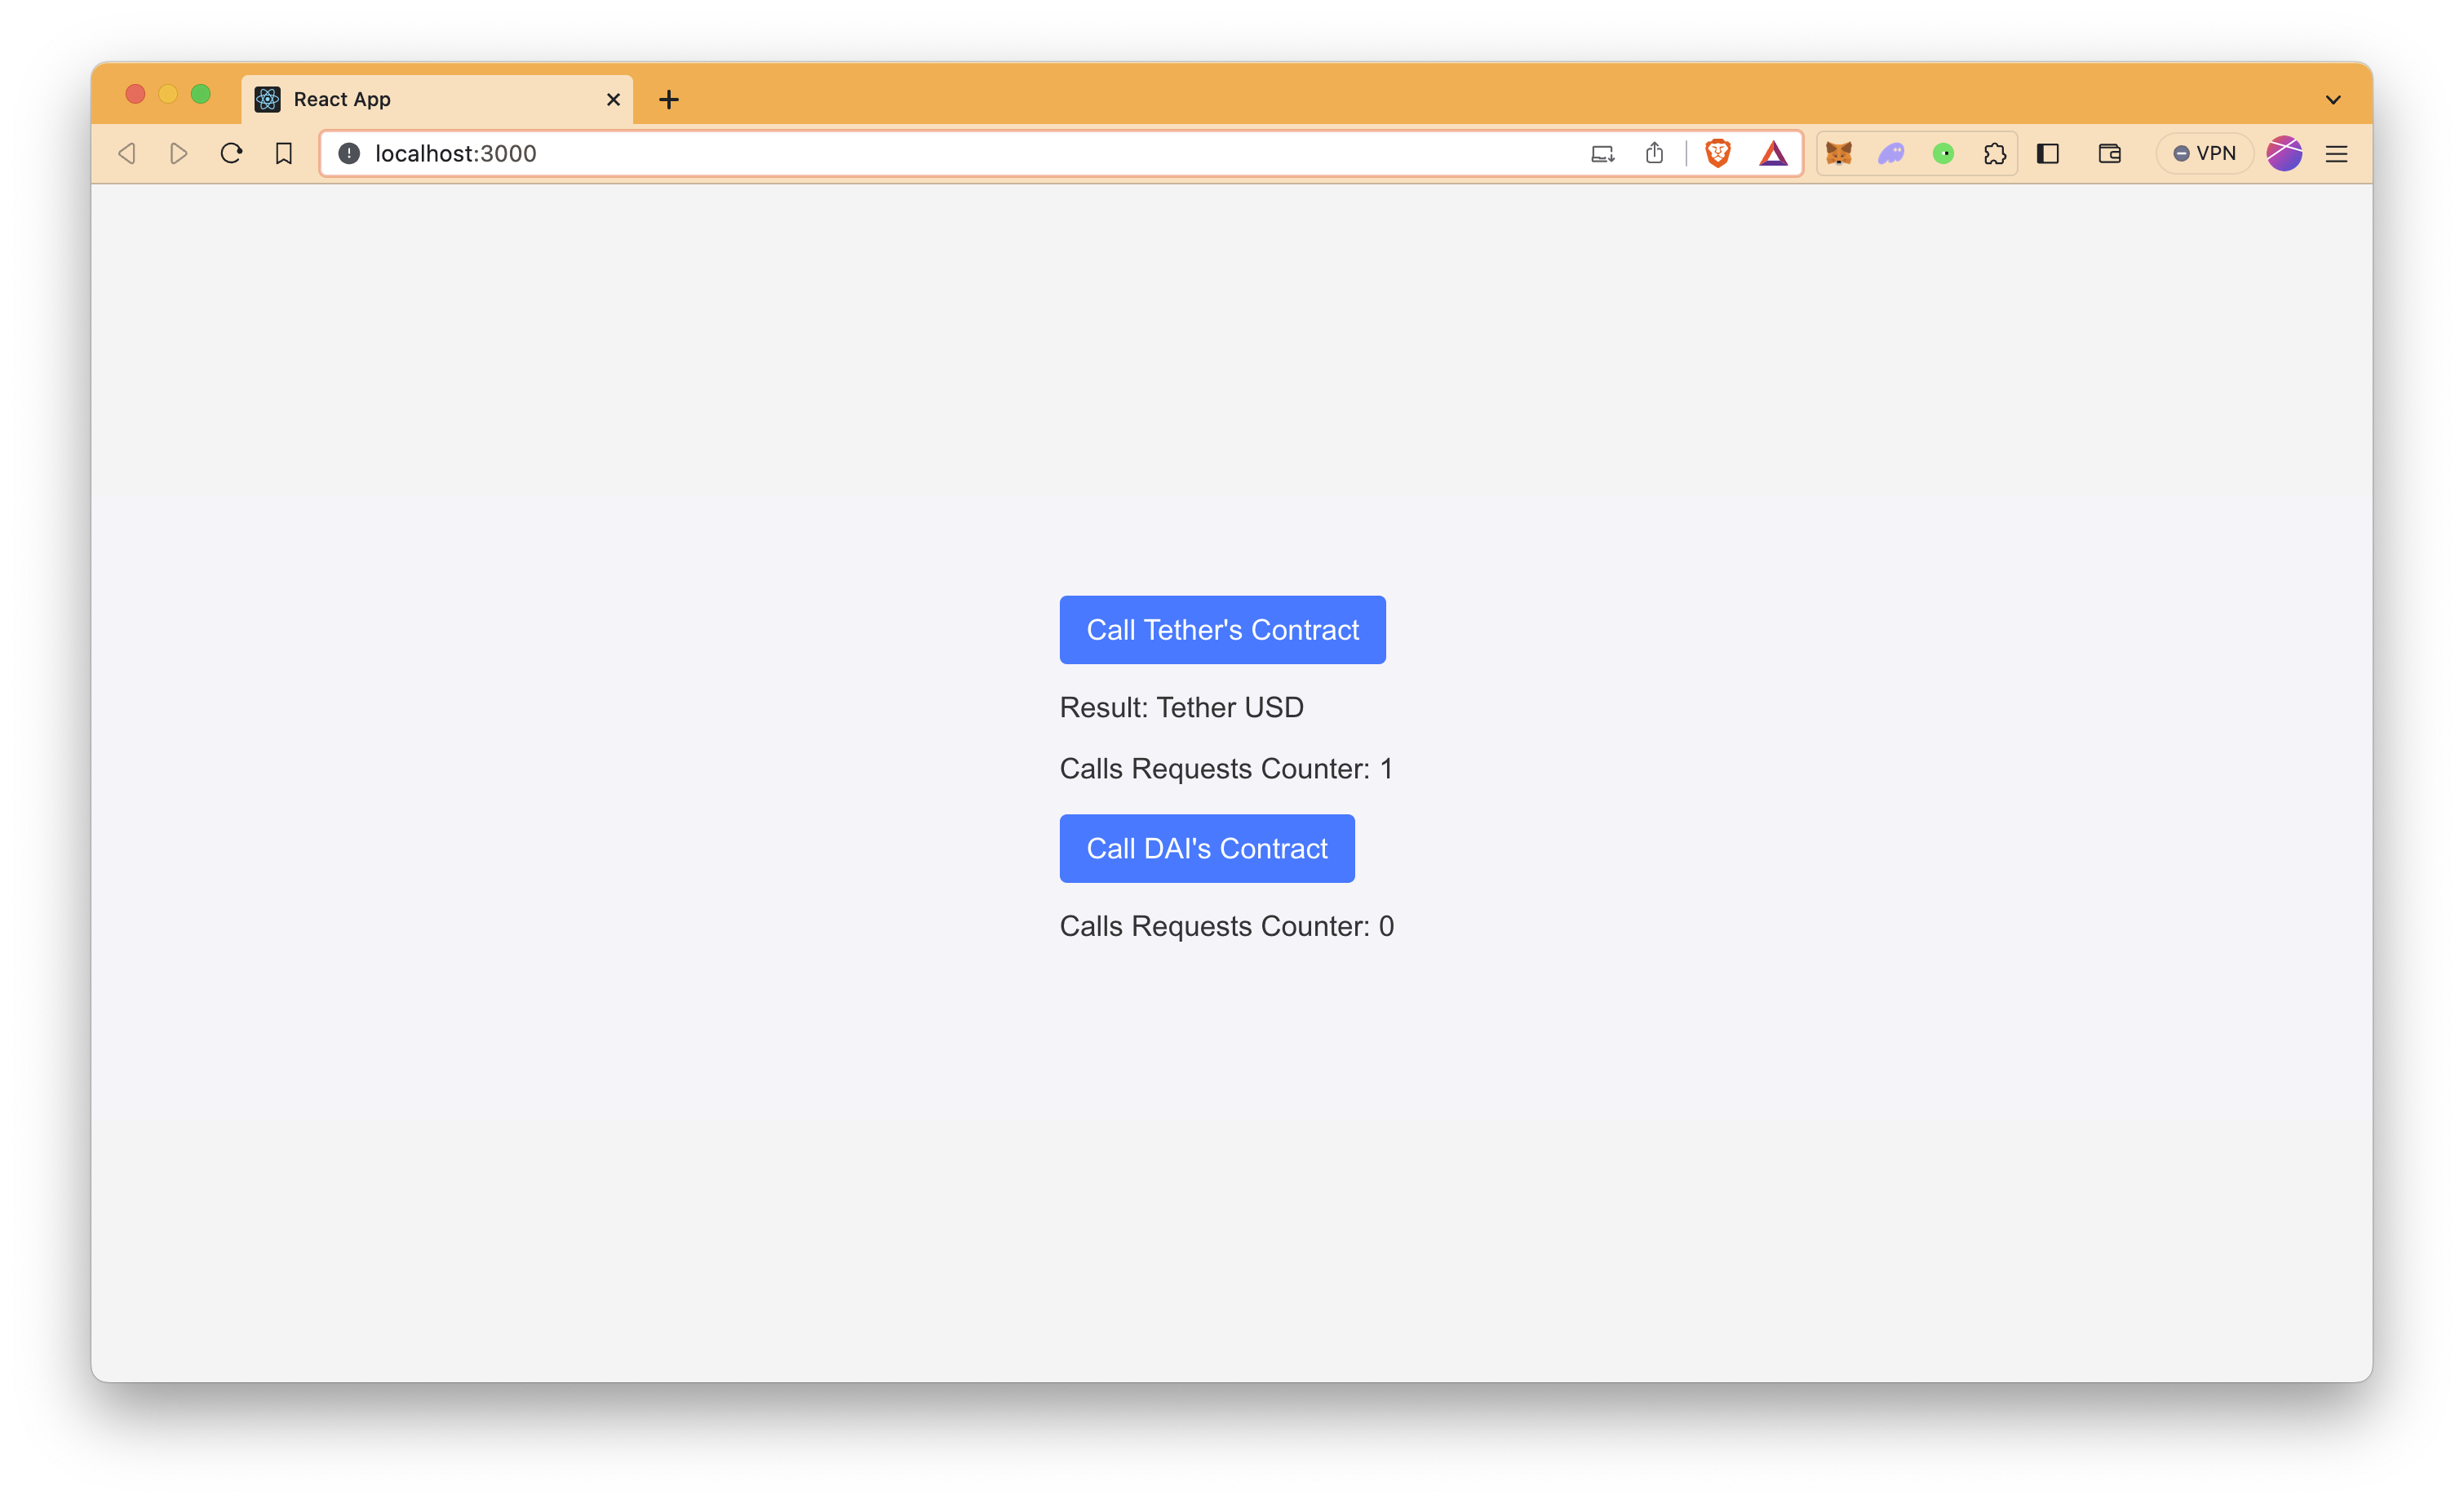
As we limit eth_calls for only Tether's contract, Call Tether's Contract button works well and fetches the result as expected, while Call DAI's Contract throws an error since it is not an allowed contract in the configuration.
Additionally, after sending 3 requests in a minute, even calling Tether's contract throws an error until the next minute since we have a visitor rate limit of 3 requests/minute.
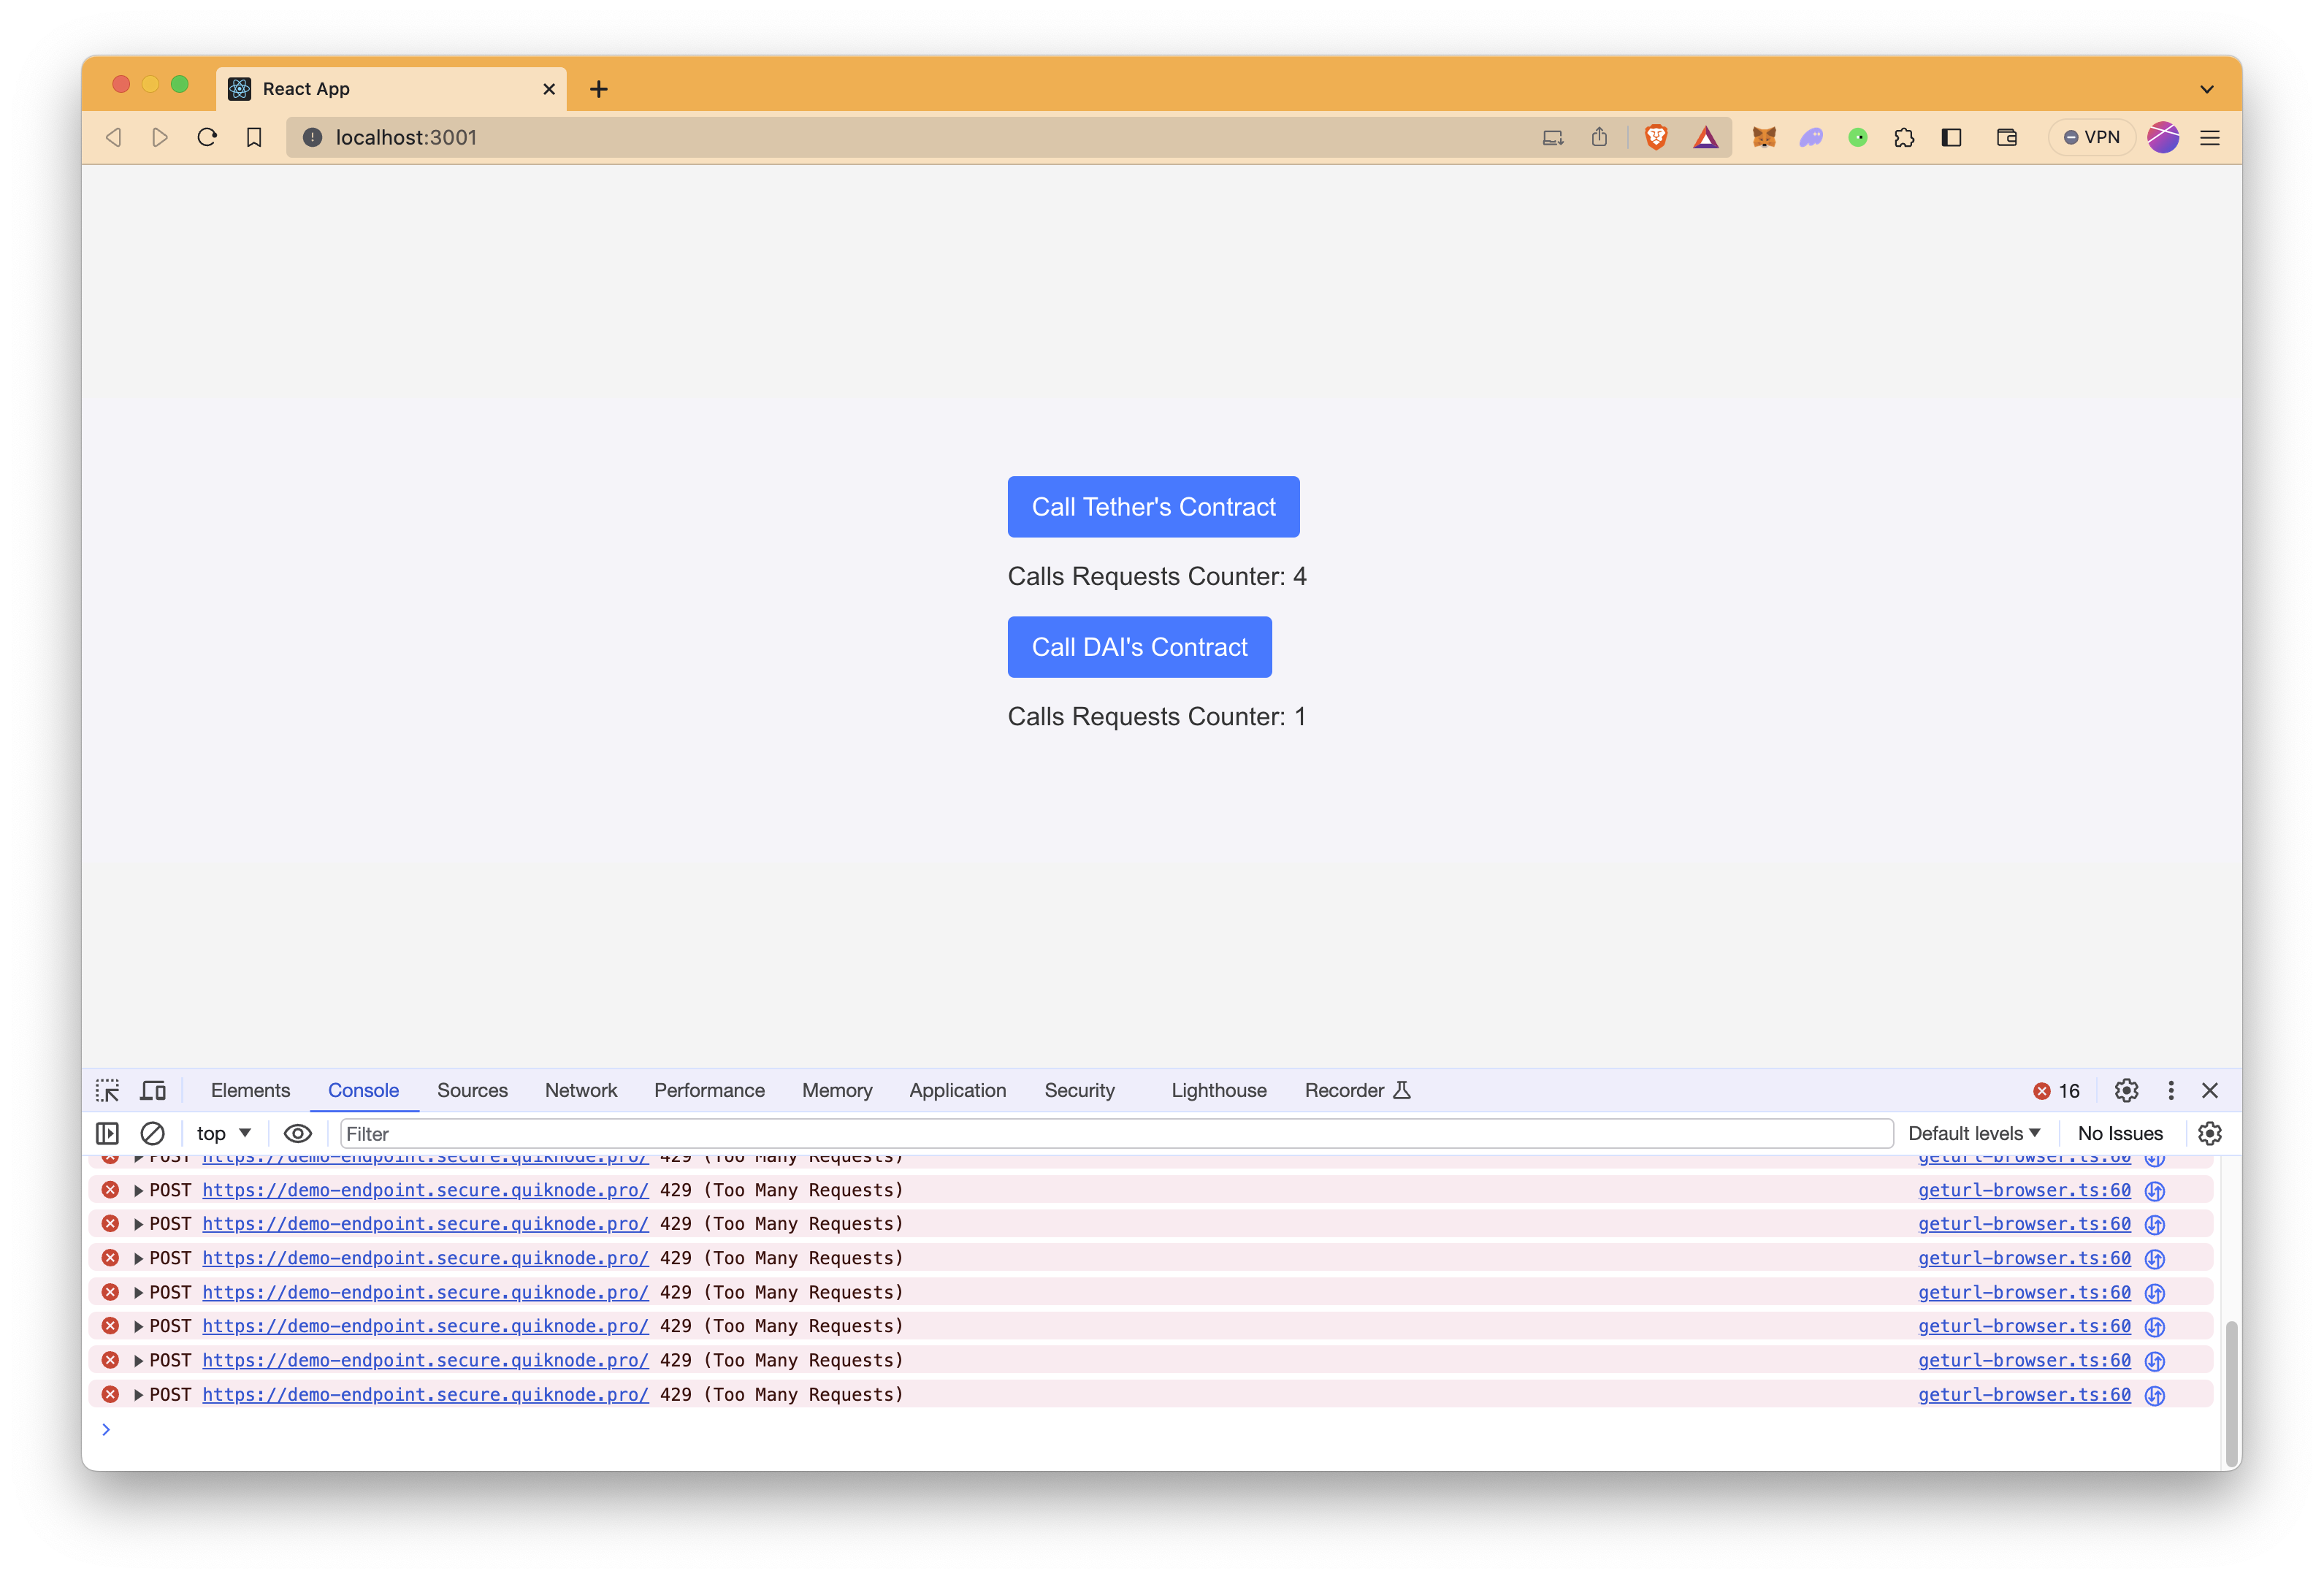
To monitor endpoint-related errors, it's recommended to check the browser's developer console.
To open the developer console window on Chromium browsers, use the keyboard shortcut Ctrl-Shift-J on Windows/Linux or Cmd-Option-J on a Mac.
Why Endpoint Armor is Useful
Endpoint Armor is an additional layer of security on top of your current security settings like Authentication tokens, JWT, IP, and referrer whitelisting (and more). Endpoint Armor enables you to define rate limits and smart contract function whitelisting, thus restricting endpoint usage to only authorized activity.
By setting rate limits, it guards against unwanted usage on your endpoint, and through smart contract function whitelisting, it can protect unwanted access to specific transactions like fund transfers in DeFi applications.
Conclusion
In conclusion, the use of Endpoint Armor, with its versatile configurations like method-specific rate limits, global rate limits, and the contract allowlist, offers a robust layer of security and efficiency for your blockchain endpoint. It empowers you to precisely manage access and control traffic, ensuring that your endpoint remains secure, responsive, and optimized. Implementing these features not only enhances the security against unauthorized access and potential attacks but also ensures a stable and efficient operation of your blockchain applications, ultimately contributing to the reliability and trustworthiness of your services.
Subscribe to our newsletter for more articles and guides on Web3 and blockchain. If you have any questions, check out the QuickNode Forum for help. Stay up to date with the latest by following us on Twitter (@QuickNode) or Discord.
We ❤️ Feedback!
Let us know if you have any feedback or requests for new topics. We'd love to hear from you.