9 min read
Overview
In this technical guide, we will explore QuickAlerts and Uniswap, two powerful tools revolutionizing the web3 landscape. But that's not all—we'll also delve into the fascinating realm of Twitter bots and show you how to create your very own bot that tweets whenever a new liquidity pool on Uniswap (v3) is created. Each tweet from your Twitter bot will include a direct link to the dynamic insights on Dextools.io. So, whether you're a seasoned crypto enthusiast or just beginning to explore the possibilities of web3, let's dive in and start building!
What You Will Do
- Learn about QuickAlerts
- Create a QuickAlert that tracks new Liquidity Pools (LP) on Uniswap v3
- Create a Twitter Bot that tweets a link to the liquidity pool and Dextools.io every time an LP is created
What You Will Need
- Basic understanding of programming concepts in JavaScript
- Basic understanding of DeFi
- A QuickNode Account (you can create one for free here)
- Twitter API Keys
- ngrok and Ethers.js, and twitter-api-v2 installed
| Dependency | Version |
|---|---|
| node.js | 18.16.0 |
| ethers.js | 5.4 |
| twitter-api-v2 | 1.15.0 |
What is QuickAlerts?
QuickAlerts (by QuickNode) enables you to harness the power of real-time blockchain data and advanced alerting features.
QuickAlerts allows you to create custom expressions and receive real-time notifications for various activities, including but not limited to:
- Monitoring wallets, contracts, NFTs, tokens, transactions, blocks, validators, and more.
- When a specific wallet sends and/or receives a transaction
- Complex examples like: Whenever the fees burned in a block are > .2 ETH AND there is at least one Uniswap transaction within the block
When a QuickAlert is triggered, a user can receive notification payloads delivered to one or more destinations in real time. You can think of QuickAlerts as real-time blockchain push notifications.
To learn more about QuickAlerts and its capabilities, check out this QuickNode Guide and QuickAlerts docs.
What is Uniswap?
Uniswap is a decentralized exchange (DEX) protocol built on the Ethereum blockchain. It enables users to trade cryptocurrencies directly from their digital wallets without the need for intermediaries like centralized exchanges (e.g., Coinbase). Uniswap operates on the concept of automated liquidity provision through the use of liquidity pools.
In the context of Uniswap, liquidity pools refer to pools of tokens that are locked into smart contracts to facilitate decentralized trading. These pools consist of two tokens, typically a base token (e.g., Ether) and a quote token (e.g., a specific ERC-20 token). Liquidity providers (LPs) contribute both tokens to the pool (this doesn't have to be equal, and with Uniswap V3 most of the time it's not as compared to V2), and they receive liquidity pool tokens (known as LP tokens) in return. These LP tokens represent the LP's share in the pool.
What is Dextools.io?
Dextools.io is a platform designed to provide users with tools and analytics for decentralized exchanges (DEXs) in the DeFi space. It offers a range of features and functionalities in analyzing and monitoring trading activity on various DEXs.
Now that you have a basic understanding of the tools you'll use to build a Twitter bot powered by QuickAlerts, let's get started!
Setting up QuickAlerts on QuickNode
In this section, we'll create a QuickAlert that tracks whenever a new liquidity pool is created. To do this, we'll have to configure three things, the chain and network we want the QuickAlert to track, the custom expression (logic) we'll use to identify blockchain events and the Webhook destination we will be sending our alerts to. The Webhook (payload) will be delivered to a Express.js server running on ngrok.
Let's get started!
Navigate to QuickNode and login. Once logged in, click the QuickAlerts tab on the left sidebar. Then, click Create QuickAlert.
1. Select Template
In the Select Template section, we'll name our alert UniswapLPListener and choose the Ethereum chain and Mainnet network. For the template, select a Blank Template.
2. Create Expression
In this section, we'll input the logic in order to identify when a new liquidity pool is created. First, let's do some research to see what events are emitted from the Uniswap smart contract when a pool (i.e., LP) is created. This previously created pool (https://etherscan.io/tx/0xd226bae0548daac8923828216918d7d82da5c3567324d42fdd4dacc2d28eb411) shows the following logs emitted:
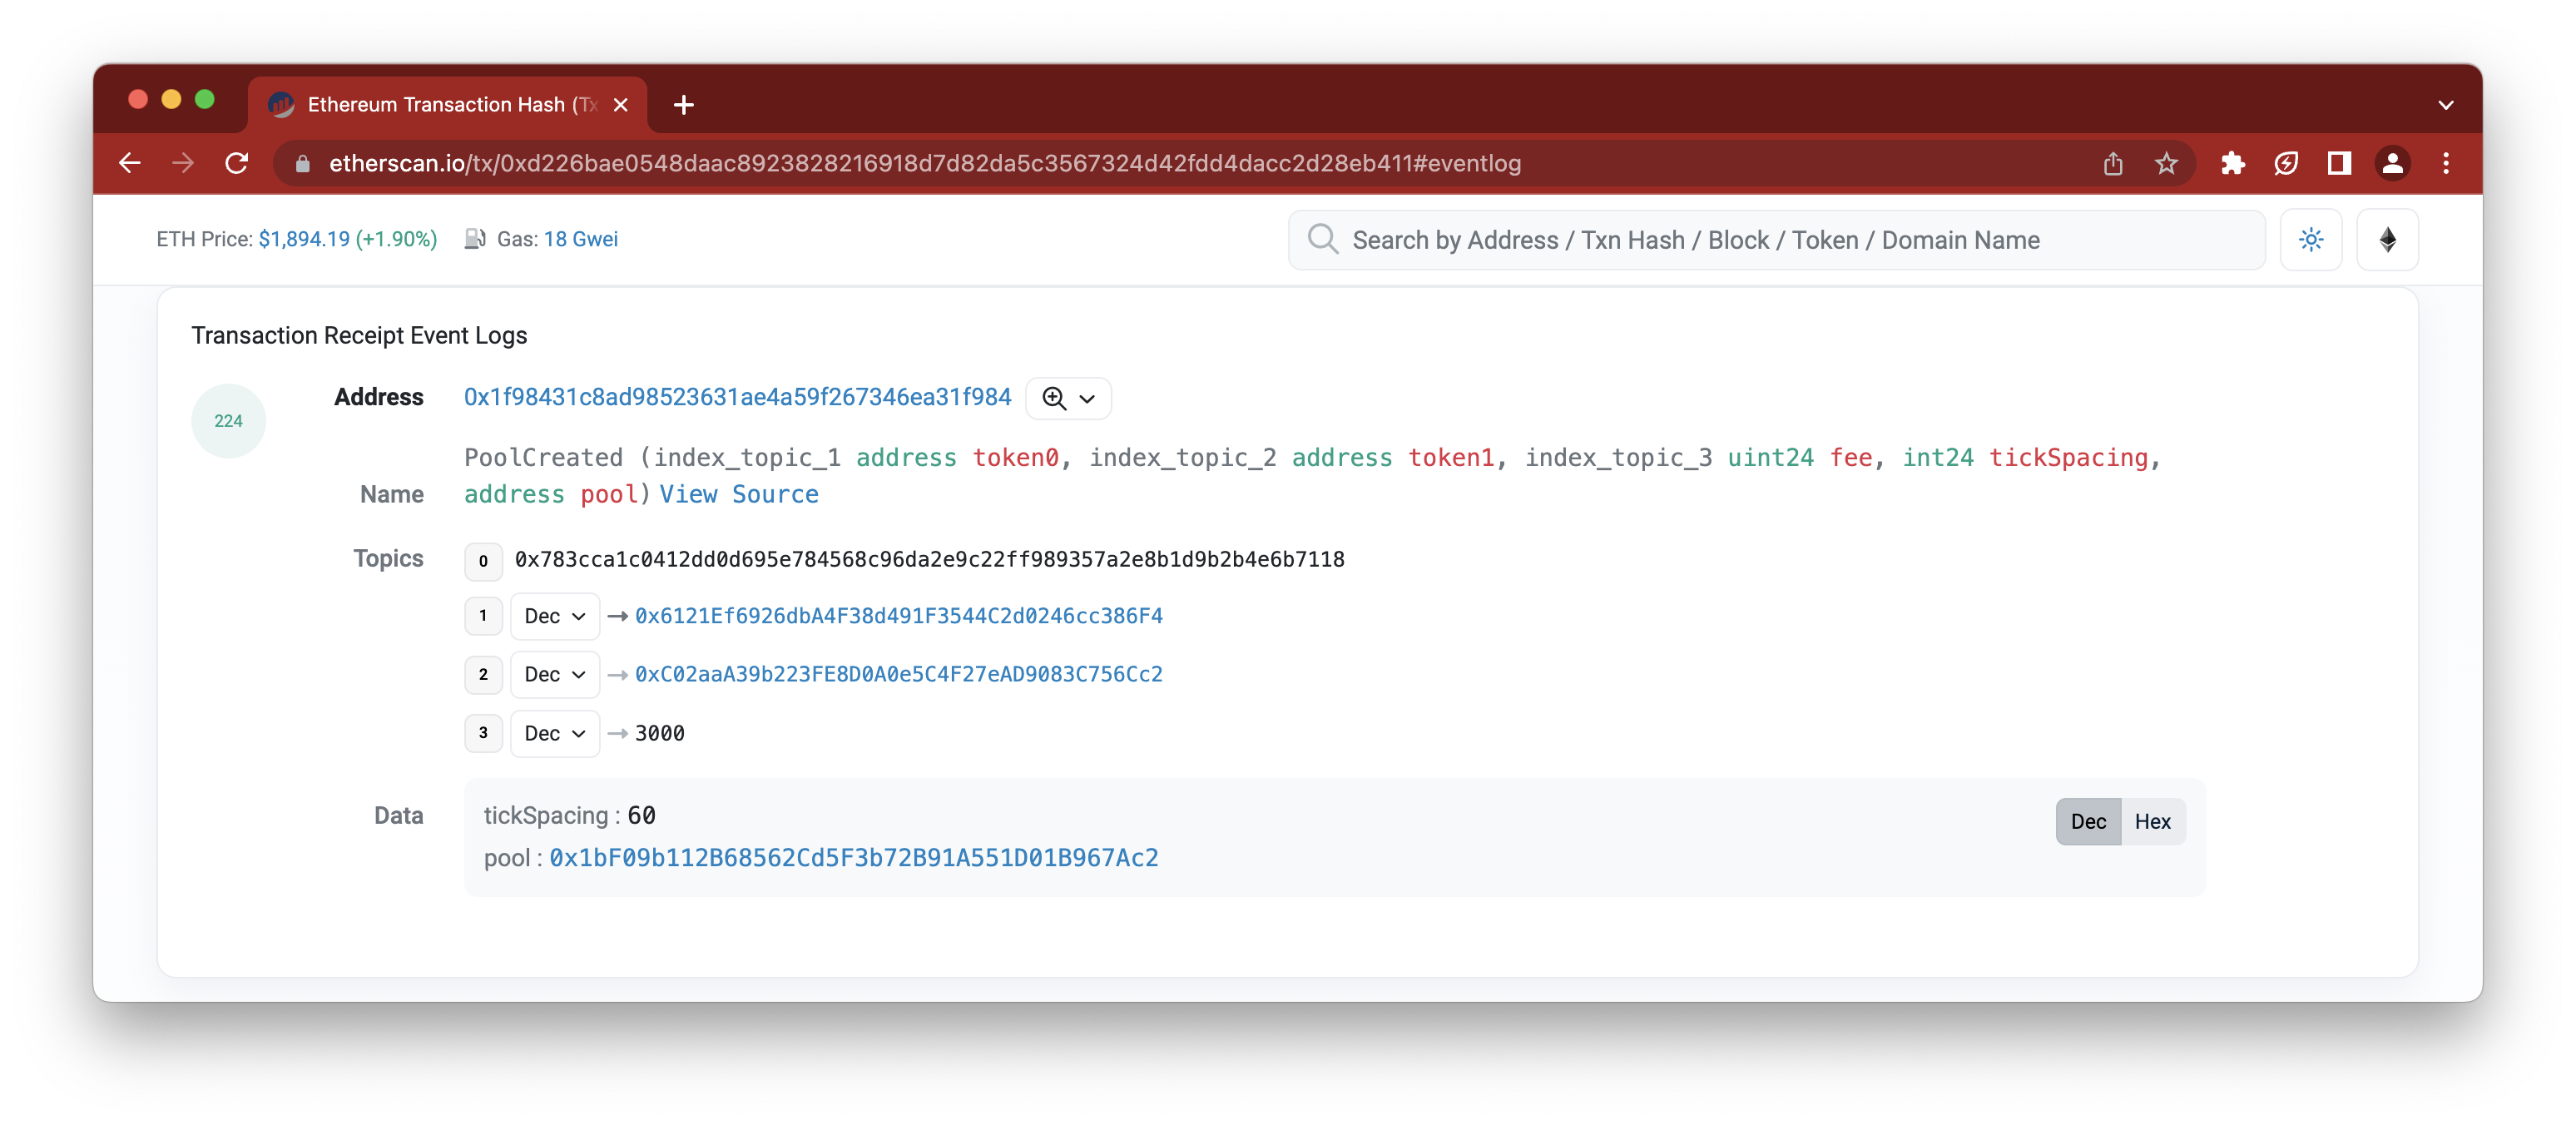
Let's better understand the information displayed above.
The Address field refers to the UniswapV3Factory smart contract. This smart contract manages the deployment of Uniswap V3 liquidity pools and manages ownership and control over pool protocol fees. More info can be found here.
In the next line (e.g., Name), it displays the event name, PoolCreated, which is emitted when the createPool function is called on the UniswapV3Factory smart contract. The fields within the parenthesis (i.e., (index_topic_1 address token0, index_topic_2 address token1, index_topic_3 uint24 fee, int24 tickSpacing, address pool)) are the fields logged in the event.
The Topics field displays the actual data emitted from the transaction. Topic 0, refers to the signature of the event. The next set of Topics (e.g., 1-3) refers to the tokens being used in the pool and the fee the pool will retrieve when someone conducts a swap. In our case, the token addresses are, 0x6121Ef6926dbA4F38d491F3544C2d0246cc386F4 and 0xC02aaA39b223FE8D0A0e5C4F27eAD9083C756Cc2 while the fee is 3000 which equates to 0.3%.
The last field Data logs the tickSpacing, which refers to the pool smart contract address created (i.e., 0x1bF09b112B68562Cd5F3b72B91A551D01B967Ac2).
Now, to create the expression on QuickAlerts, let's use the following logic:
1tx_logs_topic0 == '0x783cca1c0412dd0d695e784568c96da2e9c22ff989357a2e8b1d9b2b4e6b7118'2&&3tx_logs_address == '0x1f98431c8ad98523631ae4a59f267346ea31f984'
The expression above tracks the position of the topic in the 0 index, along with the smart contract address. Additionally, you could add multiple expressions together. For example, you could add logic to make sure the value added to the pool is over a certain amount or track more than one decentralized exchange such as Uniswap V2.
In the next step, we'll test the expression on some historical block data through the QuickNode UI.
With our QuickAlert expression inputted in the Create Expression field, let's test it. Click Test Expression and wait for the backtest to complete. You can increase the number of blocks back you want to backtest. You should see the following after:
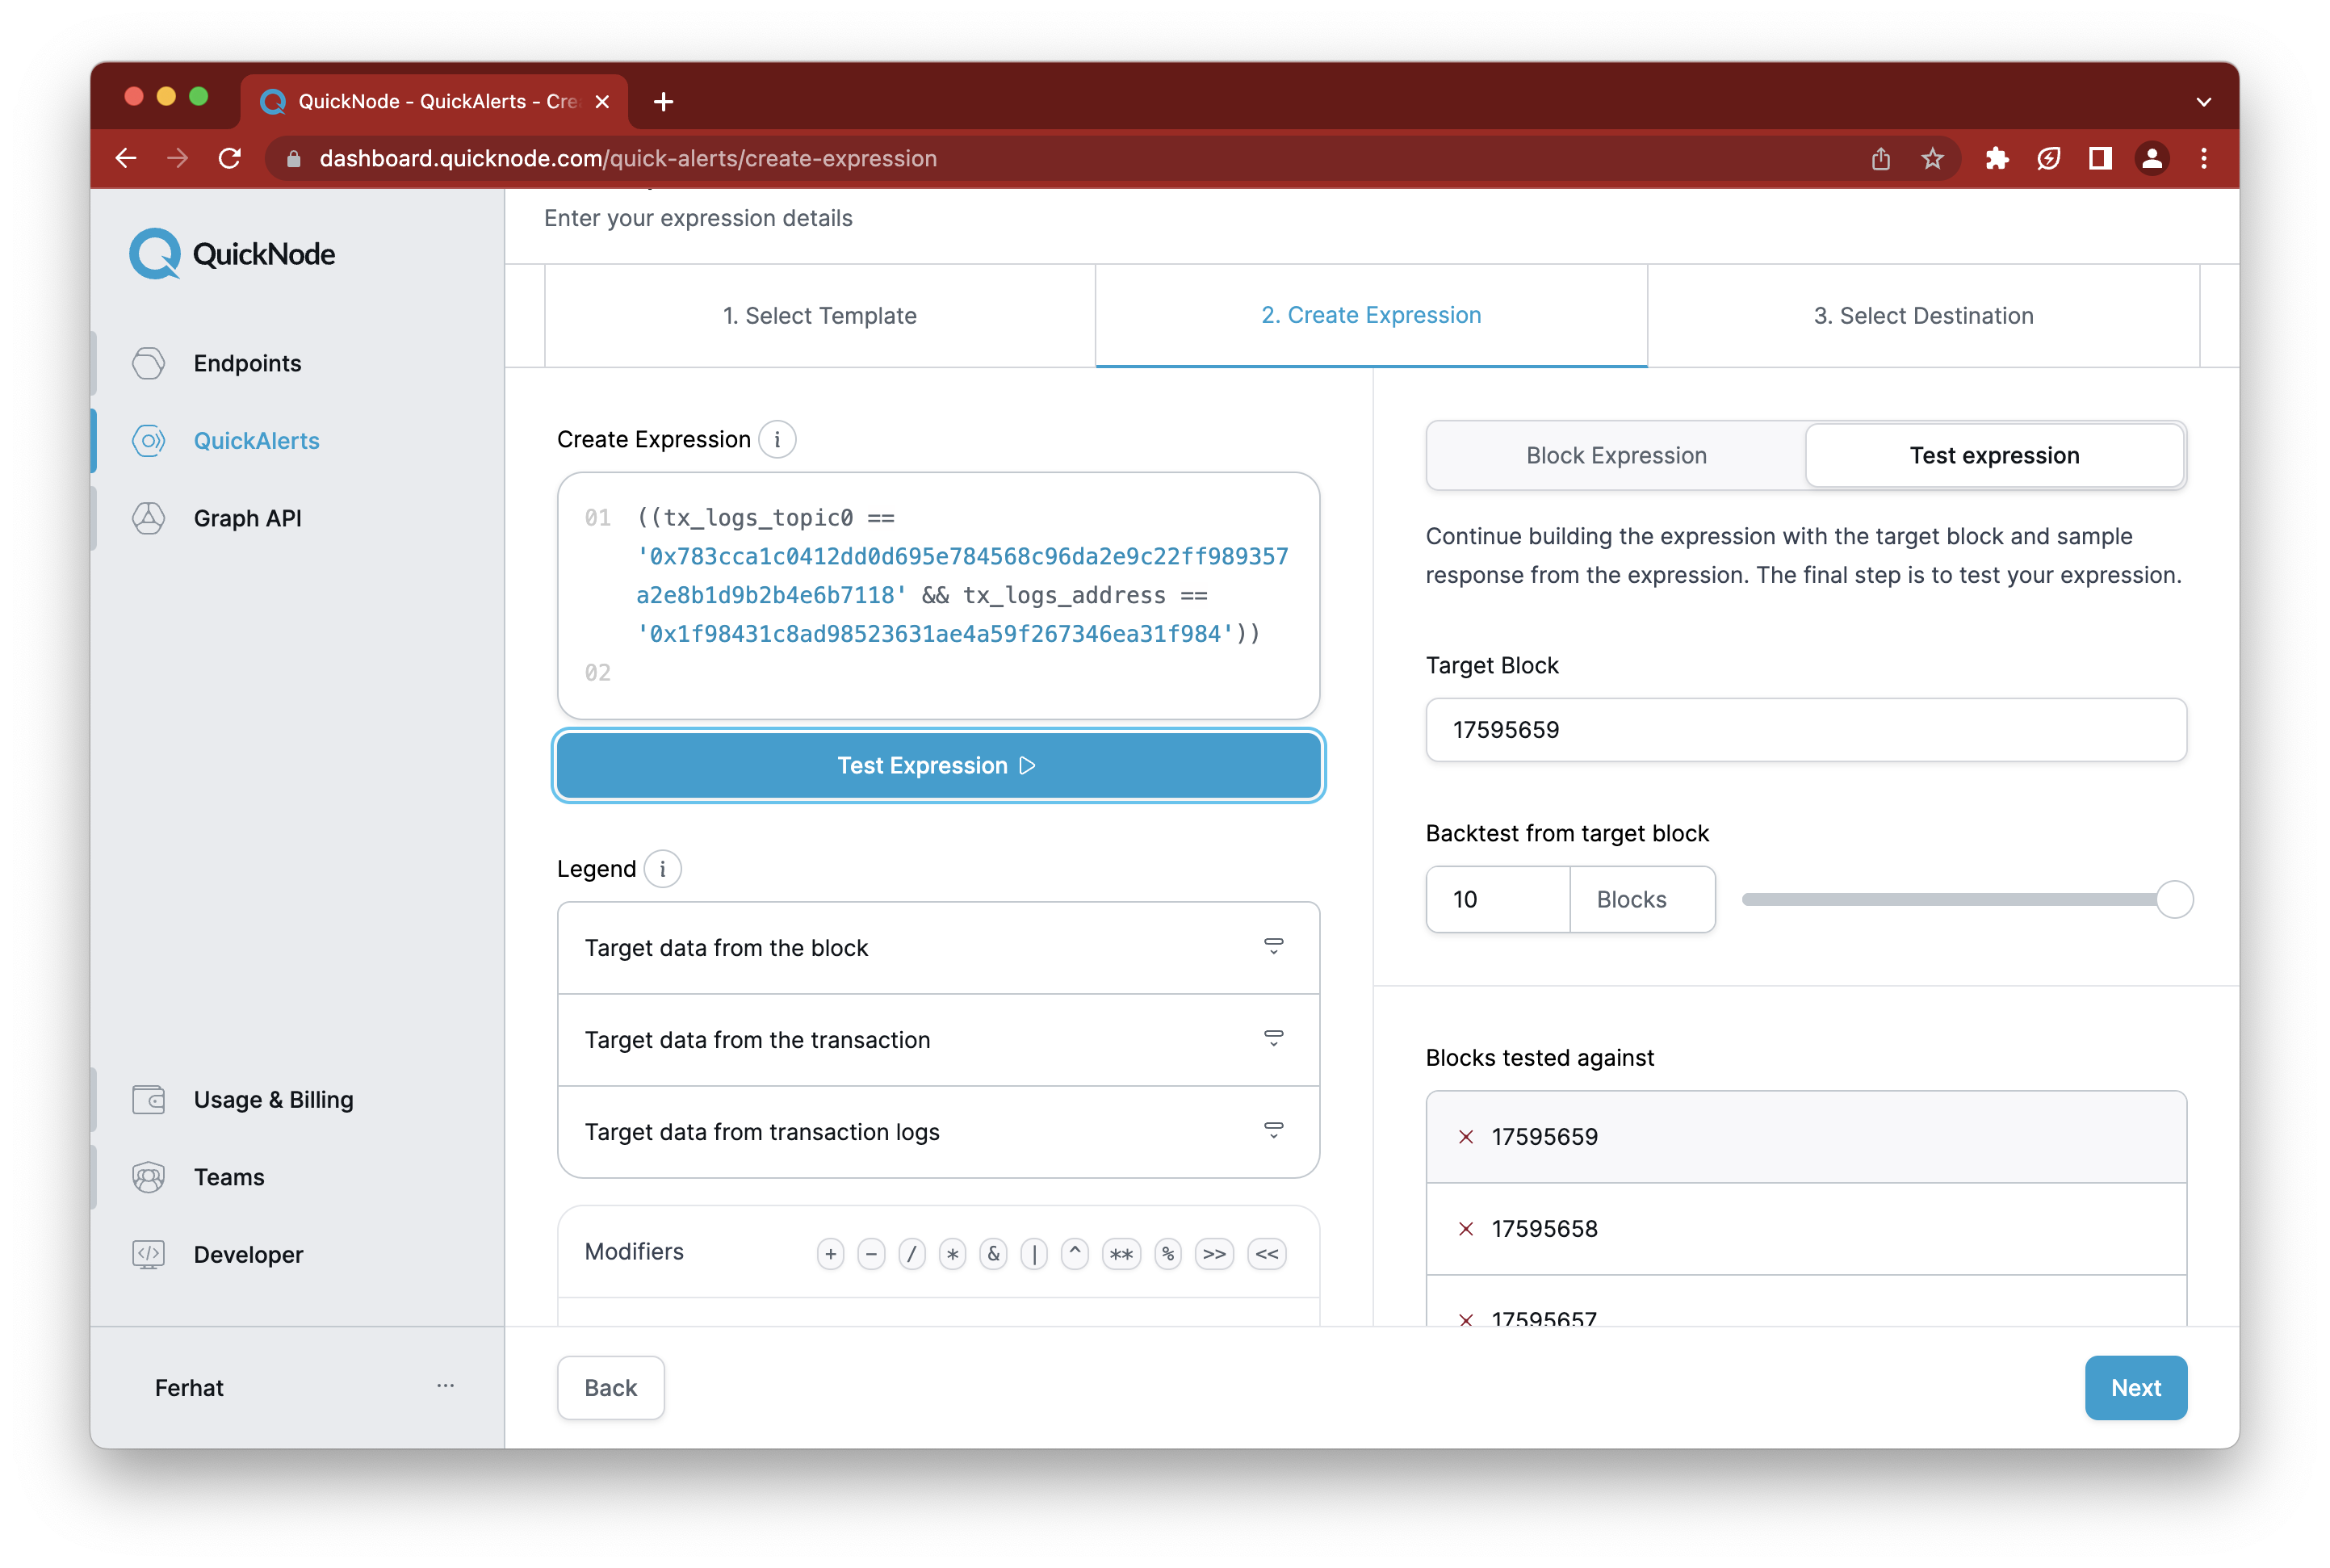
Notice the X's shown next to each block number. This represents if the expression was met in that block. If there is a checkmark, it would mean the expression was met in that block.
You can click Next if everything up to this point is working to move to the third step.
3. Select Destination
Now on the Select Destination tab, we'll be creating a Webhook. In short, Webhooks are configured with a URL you input and upon triggering, QuickAlerts will send notifications to your URL.
Since we don't have a URL we can point them to yet, let's take a pause and do it now.
Setting Up a Web App to Listen to Incoming Webhook Requests
In this section, we'll set up a web server using JavaScript and Express.js to listen to incoming Webhook requests. At the end of this section, we'll have a URL we can provide to QuickNode as a URL destination.
Open a terminal window, and run the following commands to create a project folder, install required dependencies, create a file that will serve our web app and one to store our environment variables (e.g., Twitter credentials)
mkdir quickalerts-app && cd quickalerts-app && npm init --y && npm i express ethers@5 dotenv twitter-api-v2 && echo > index.js && echo > .env
Then, open up index.js and input the following code:
require("dotenv").config();
const ethers = require("ethers")
const express = require("express");
const { TwitterApi } = require("twitter-api-v2");
const client = new TwitterApi({
appKey: process.env.API_KEY,
appSecret: process.env.API_SECRET,
accessToken: process.env.ACCESS_TOKEN,
accessSecret: process.env.ACCESS_SECRET,
});
const twitterClient = client.readWrite;
const app = express();
app.use(express.json());
const { PORT } = process.env
let types = ['uint256', 'address'];
async function tweet(message) {
try {
await twitterClient.v2.tweet(message);
} catch (e) {
console.log(e)
}
}
app.post('/webhook', async (req, res) => {
const webhook = req.body;
for (let i = 0; i < webhook.length; i++) {
console.log(webhook[i])
const block = webhook[i].blockNumber
const txHash = webhook[i].transactionHash
const data = ethers.utils.defaultAbiCoder.decode(types, webhook[i].logs[0].data)
const poolAddress = data[1]
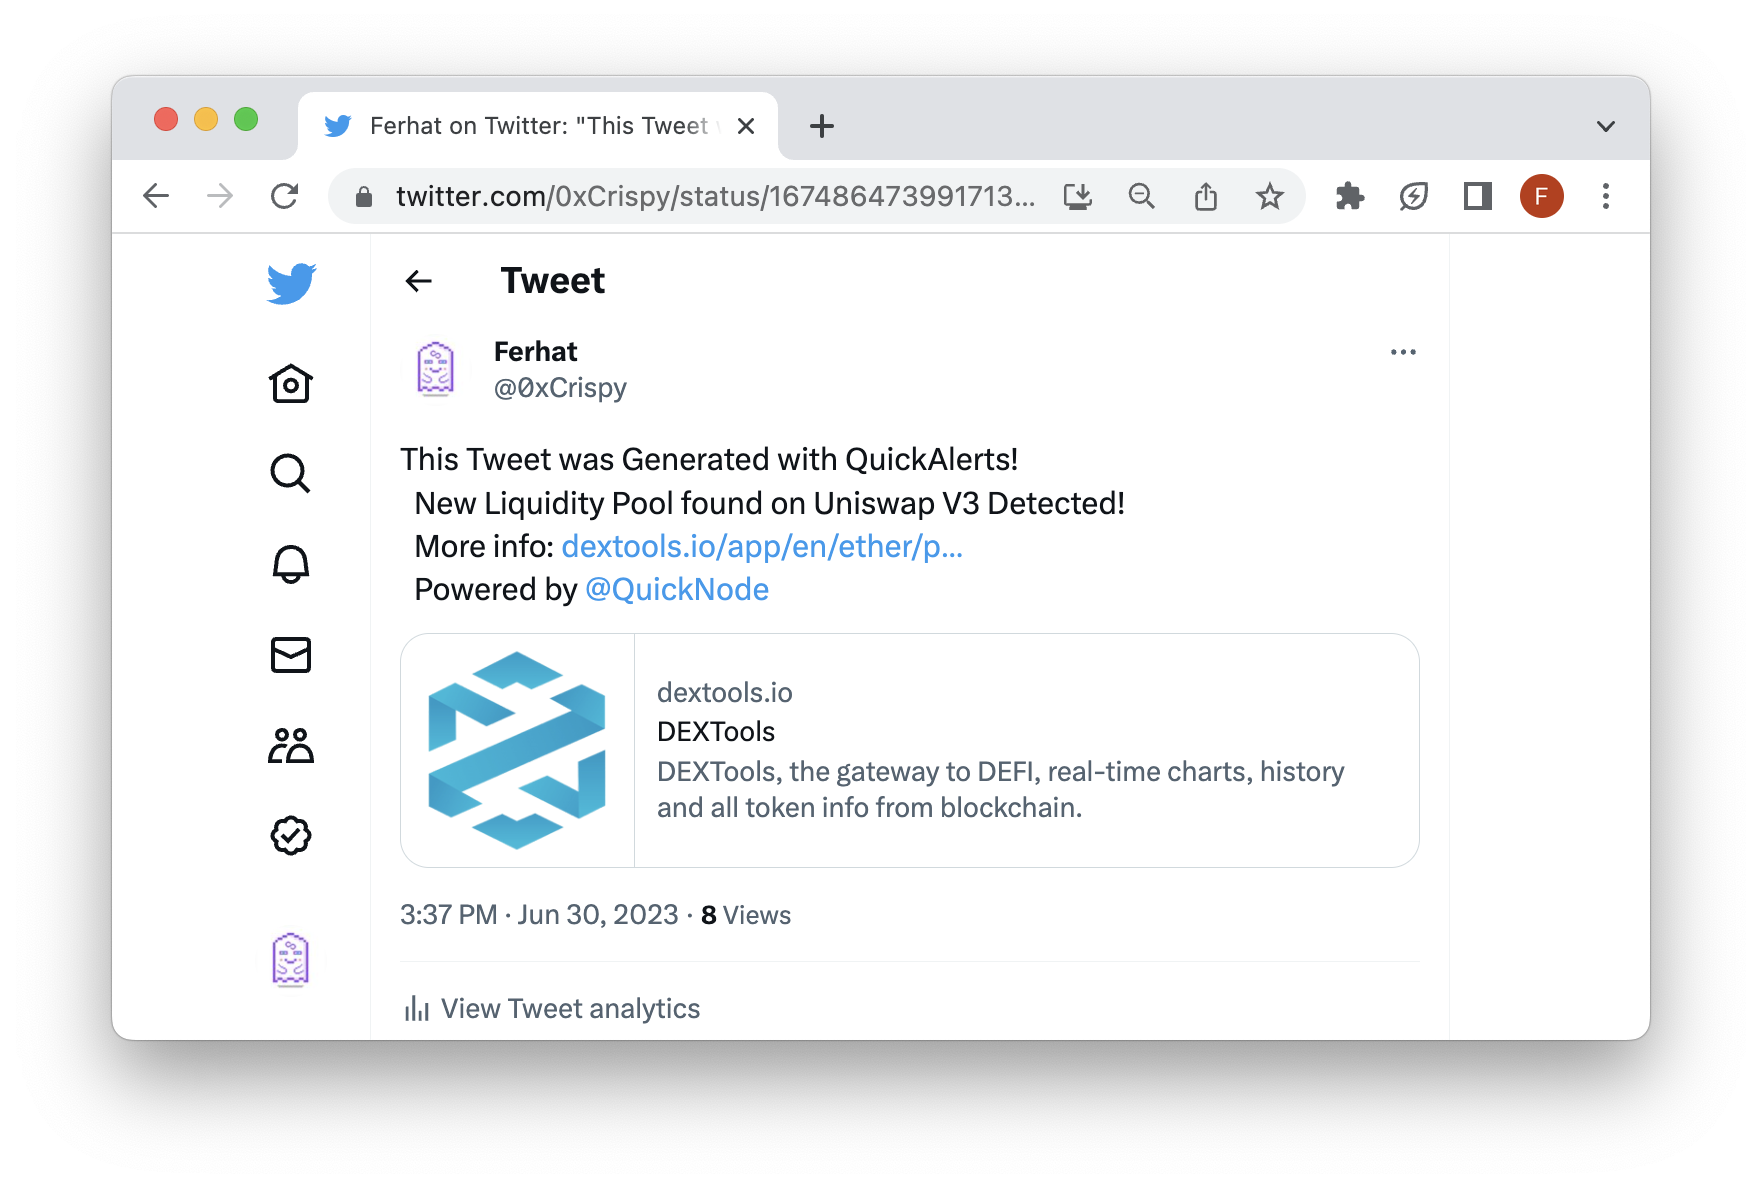
const message = `
This Tweet was Generated with QuickAlerts!
New Liquidity Pool found on Uniswap V3 Detected!
More info: https://www.dextools.io/app/en/ether/pair-explorer/${poolAddress}
Powered by @QuickNode
`
await tweet(message)
res.sendStatus(200);
}
});
app.listen(PORT, () => {
console.log(`Express server is listening on PORT ${PORT}...`);
});
Remember to save the file!
Let's briefly go over the code above at a high level. First, we import dependencies such as dotenv, express.js, and twitter-api-v2. Next, we'll define our Twitter client and set up a function (tweet) that will take a message and tweet it. In the app.post function, we set up a route that our QuickAlert will send a payload to. With this, we'll debug the incoming payload and set up our message to send to Twitter. If multiple matched receipts are detected in a block, our for loop will iterate over it and tweet each new pool address individually. At a high level, we created a Twitter client, an Express.js server, and created a /webhook POST API route to take incoming QuickAlerts and post them to Twitter.
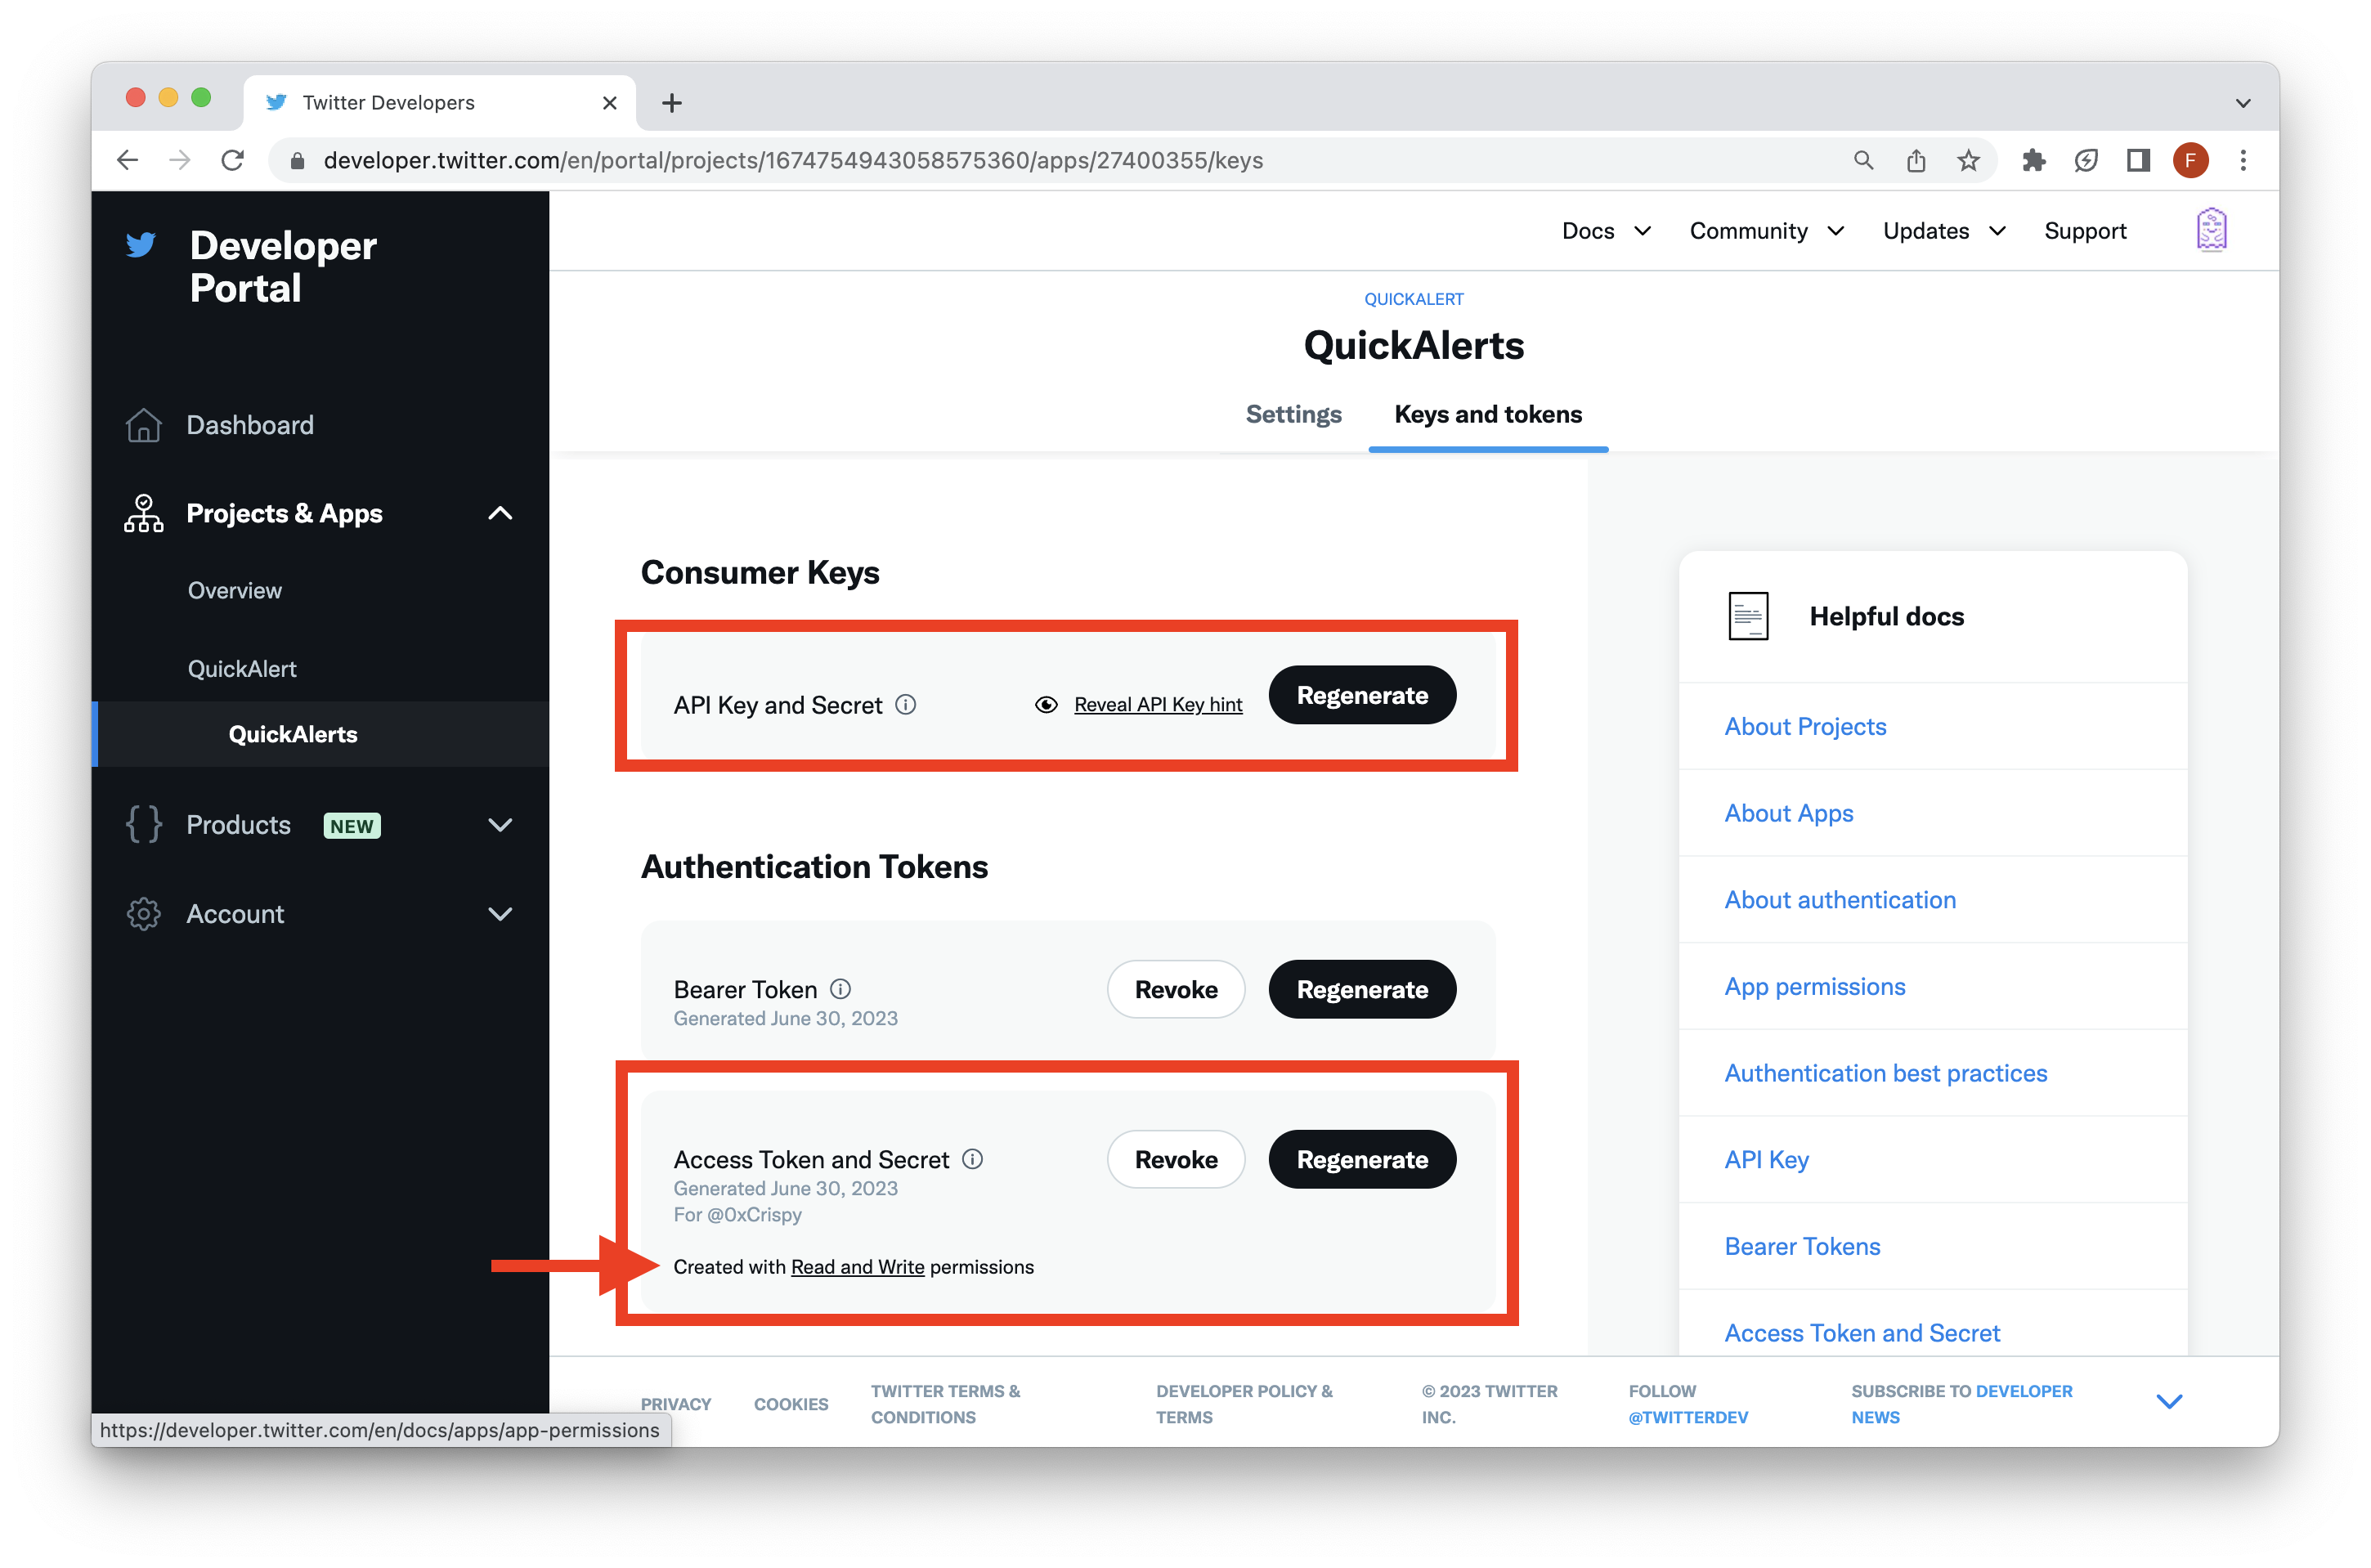
Next, let's open up the .env file and fill in our credentials. If you don't have a Twitter Development Account already, create one now and fill in the following information. You can obtain the information from your projects Keys and Tokens tab. Make sure you have proper read and write permissions like below:
PORT=8000
appKey=
appSecret=
accessToken=
accessSecret=
Now, we'll need to deploy our web server so that we have a URL we can provide to QuickAlerts. For this, we'll be using ngrok. ngrok is a fast and easy way to deploy servers to the internet.
First, make sure you have ngrok installed, then run the following command in your terminal window:
ngrok http 8000
The command starts above starts a server listening for HTTP/HTTPS traffic with a specific hostname serving port 8000.
You'll see an output similar to the following:

Then, open a separate terminal window within the same directory (i.e., quickalerts-app) and run the command below to start the local server:
node index.js
You should see a message like, Express server is listening on PORT 8000.... This means your server is up and running locally on PORT 8000 (e.g., http://localhost:8000)
**NOTE: Remember to run both servers (local and ngrok) so that your server can access your codebase
Go back to your terminal running the ngrok server and copy the URL (e.g., https://d433-115....ngrok.io) from the Forwarding field and as this will be the URL you provide as a destination for your QuickAlert Webhook. Navigate back to your web browser where you left off on the third step (e.g., Select Destination tab) and input the following details:
- Webhook name: Ngrok Server (i.e., An arbitrary name)
- URL & Request type: (This is the ngrok HTTPS URL. You'll also need to append /webhook at the end of the URL so it makes the POST request to the correct route. Your final webhook URL should look something like this: https://d433-115....ngrok.io/webhook)
- Payload: Matched Receipts (The type of response data you want. You can filter through each option and check how the response field will look. You can also check this link for more definitions.)
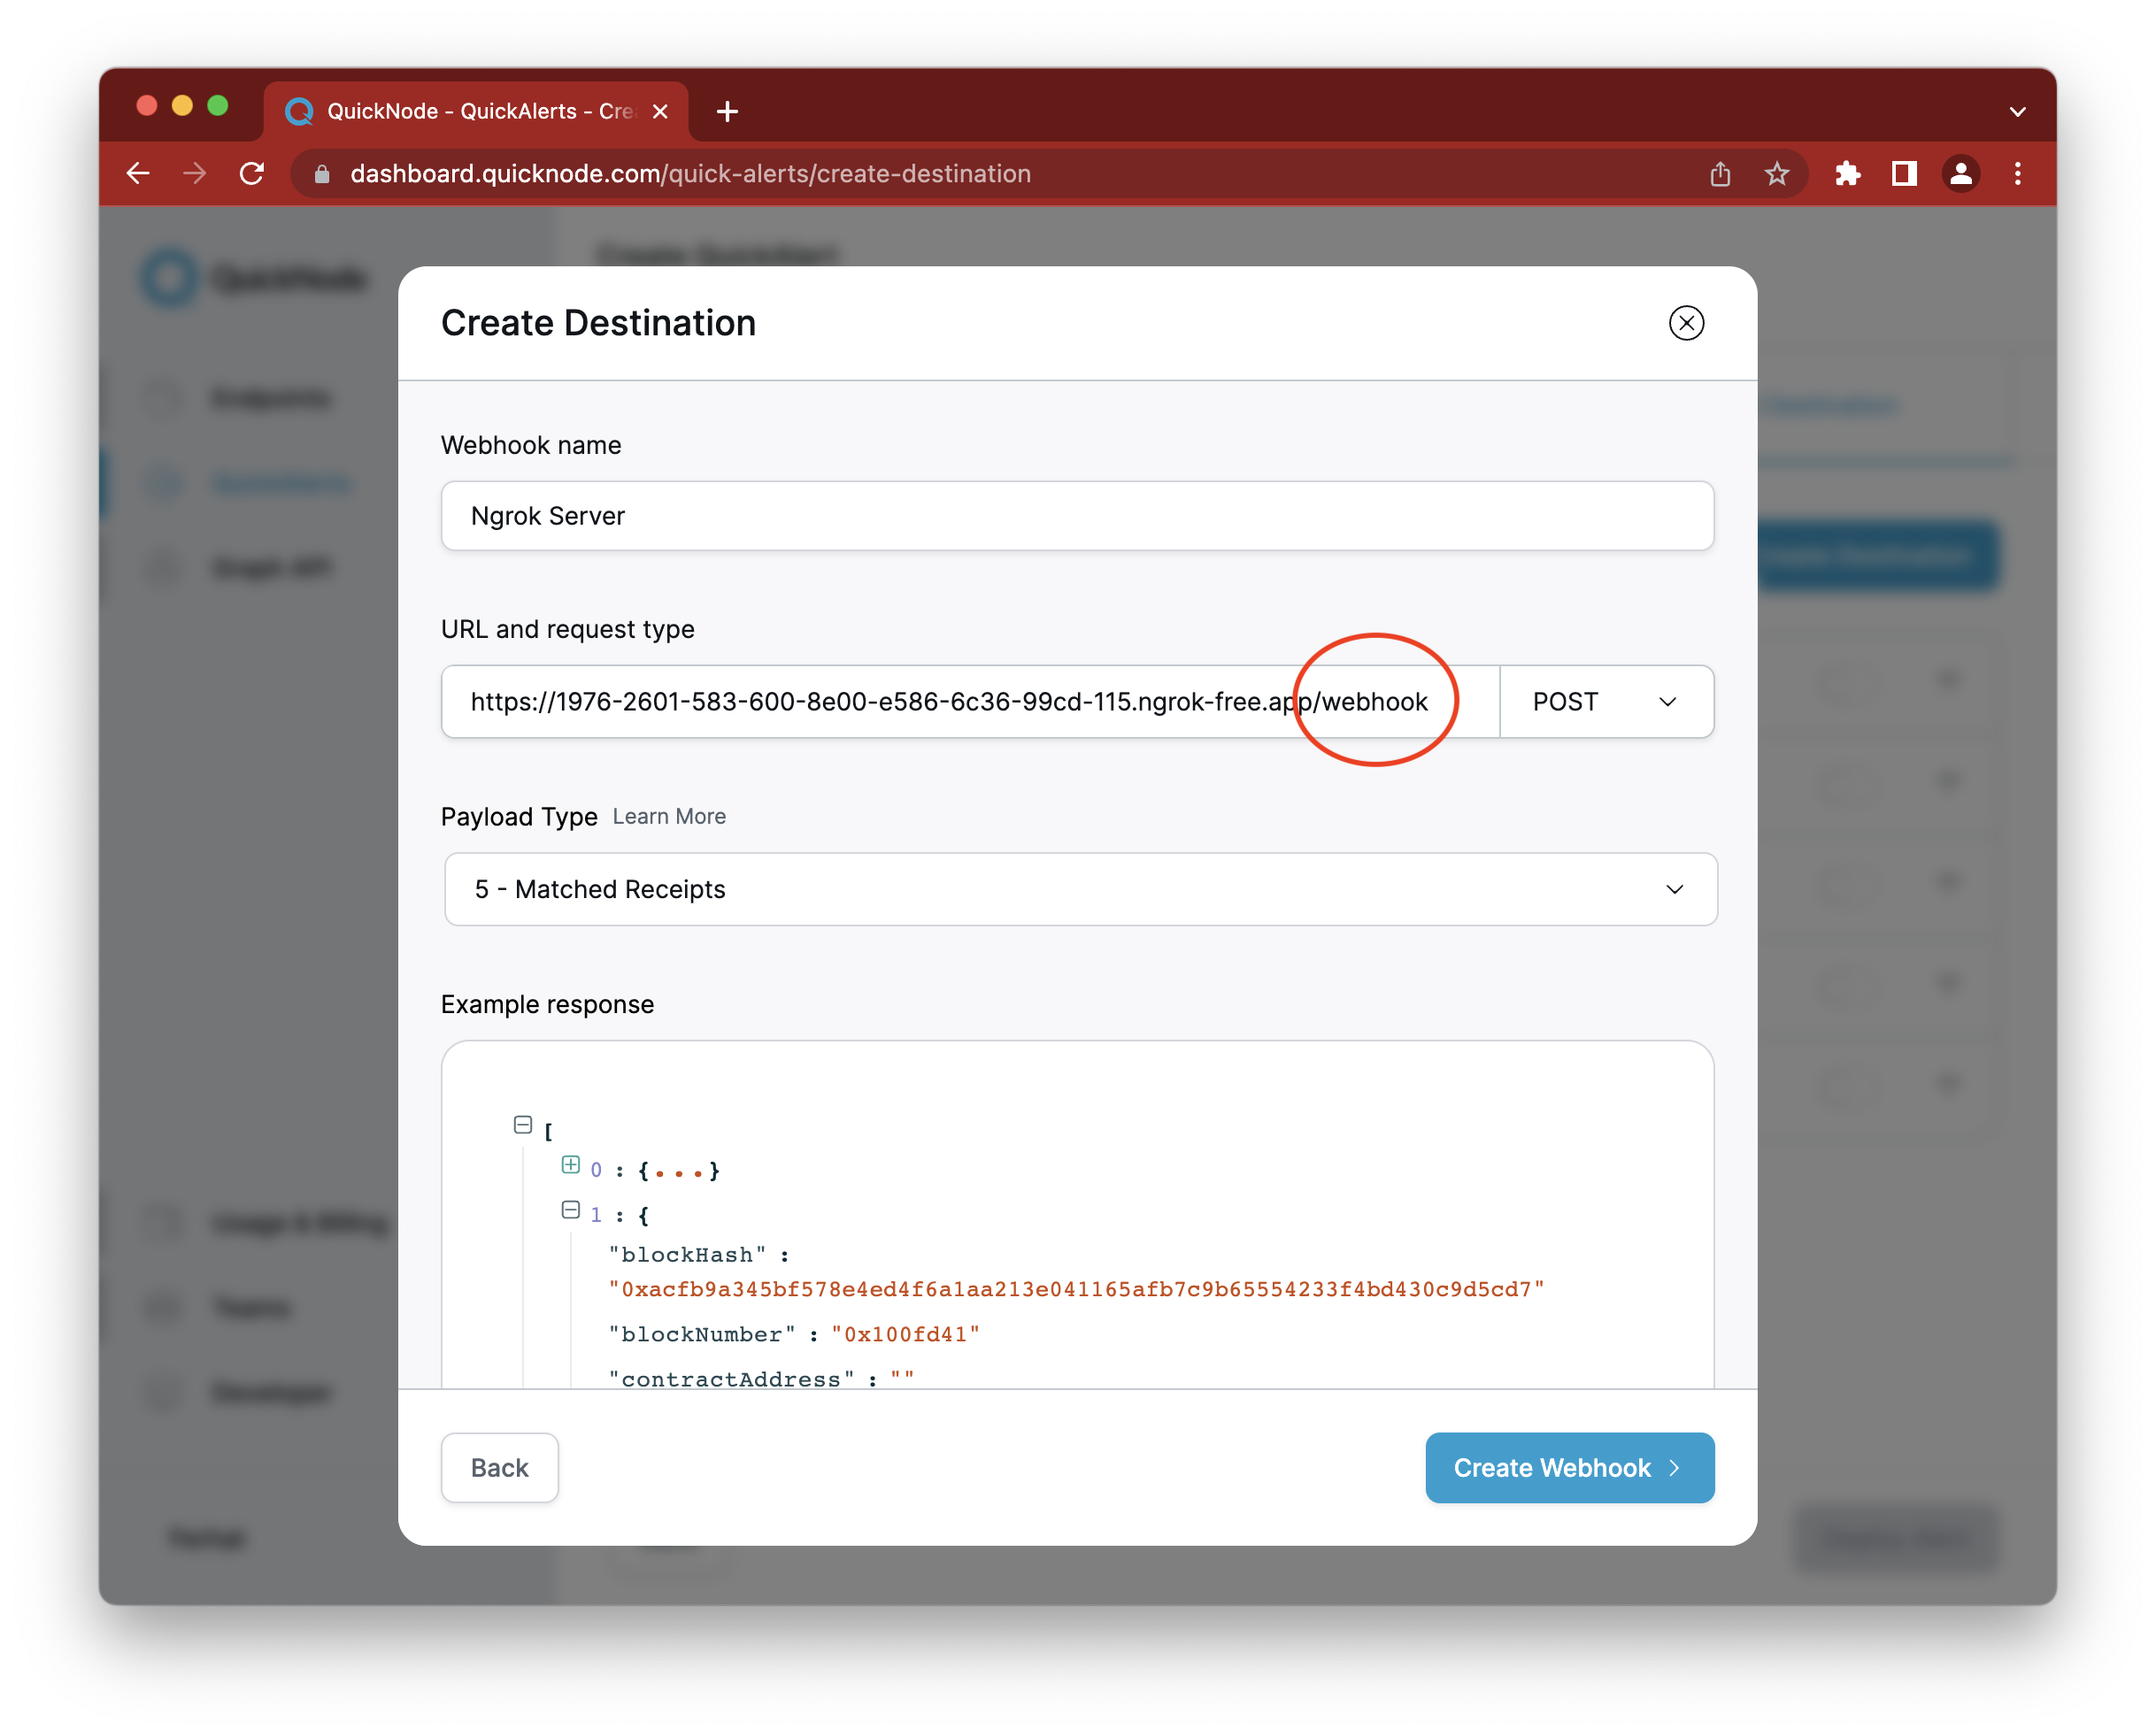
In the end, click Create Webhook, then toggle the Webhook destination on and click Deploy Alert.
With all the infrastructure created to listen to incoming Webhooks from QuickNode, let's test it out. Since we won't be creating a liquidity pool on Uniswap ourselves, we'll need to wait for one to occur. In the next section, we'll showcase how this will look.
Receiving the QuickAlert and Posting to Twitter in Real-time
Up until this point, you have created a server with Express.js that listens to incoming POST requests and makes a tweet with the Twitter API, hosted it with Ngrok, and set up a QuickAlert.
Since it could take a while for someone to create a liquidity pool on Ethereum mainnet, we'll showcase how this should look, given one occurs. You can replicate this behavior by creating your own liquidity pool and testing it on a testnet like Goerli or Sepolia.
Additionally, check out the resource below to add on top of your current Twitter bot. For example, you could add logic to your Express.js server to trade on the Uniswap upon your QuickAlert triggering.
Final Thoughts
That's it! By now, you should have your own Twitter bot tweeting whenever a QuickAlert detects a new Uniswap V3 liquidity pool. If you are building something different, we'd love to know more! Tag us on Twitter!
If you encounter any problems or have any questions, we'd love to help you! Find us on Discord or the QuickNode Forum. You can also use the QuickNode Forum to further explore topics being discussed and collaborate with others!
We ❤️ Feedback!
Let us know if you have any feedback or requests for new topics. We'd love to hear from you.